TL;DR
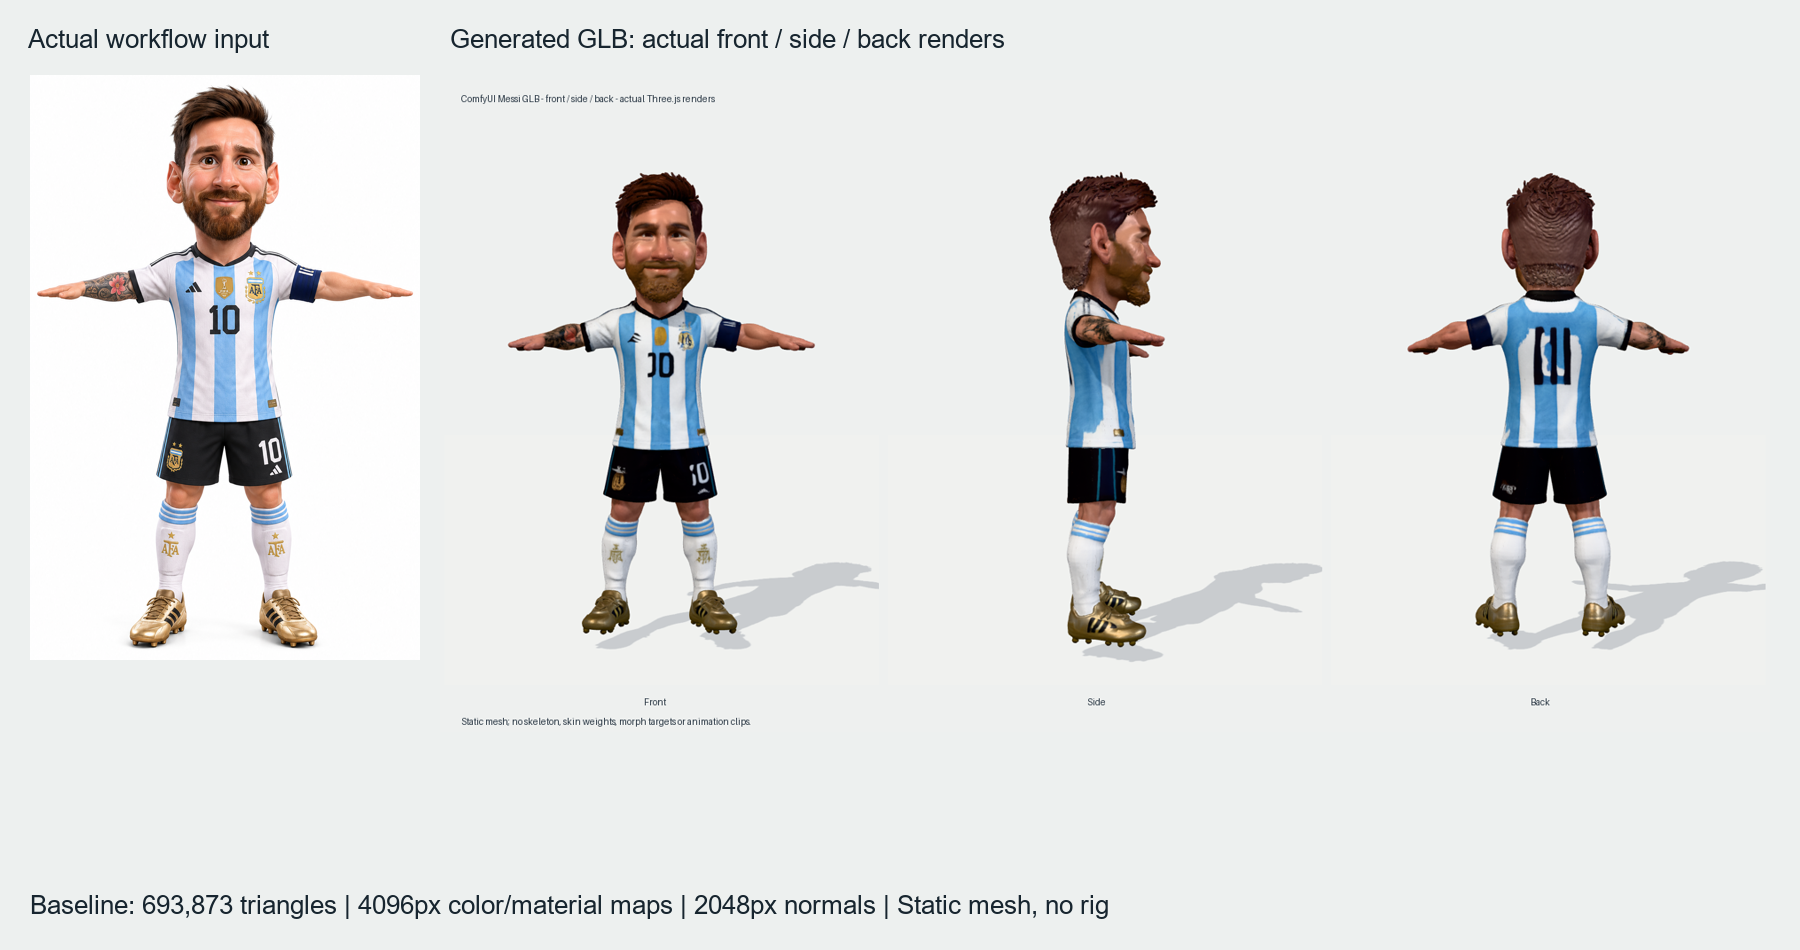
This ComfyUI Pixal3D workflow converts one image into a textured, static GLB, with a TRELLIS.2 switch included. The actual example has 693,873 triangles, 4096px color/material maps, and a 2048px normal map. It is unrigged and still needs cleanup.
- Requirements: a ComfyUI installation with the native 3D nodes, the seven model files below, suitable hardware, and an image you are authorized to use. No measured VRAM minimum or run-time estimate is available.
- Setup: download the ZIP, import the baseline JSON, choose your image, leave the model switch false for Pixal3D, verify native 1536 / remesh 768 / target 700,000 / atlas 4096 / normals 2048, then queue and inspect the saved GLB.
- Optional files: larger-budget presets remain ungenerated. They do not establish a quality improvement, an eye fix, or animation compatibility.
Download the baseline workflow · Jump to import and setup · Follow the first-run steps
This ComfyUI Pixal3D workflow turns a single character image into a textured 3D mesh, and this walkthrough starts with an actual completed example. The Messi-inspired character shown below came from the matched input image on the left. The front, side, and back views on the right are renders of the saved GLB, with the original output left untouched.
The inspected model contains 693,873 triangles, a 4096 × 4096 base-color texture, a 4096 × 4096 packed material texture, and a 2048 × 2048 normal map. It has recognizable clothing, body volume, and a textured face. It also has imperfect hands, rough hair and beard detail, and a distorted back shirt number. Those visible limitations are part of the example.
Below, you’ll find the workflow download, the required models, the exact baseline settings, and a practical path from image selection to checking the exported asset. The same graph includes a TRELLIS.2 switch. There are also two optional higher-budget experiments at the end, clearly separated from the working baseline.
1. Download the baseline ComfyUI workflow
Download the free ComfyUI Pixal3D / TRELLIS.2 baseline workflow ZIP
Start with 01-baseline/Baseline_Pixal3D_1536.json. It preserves the generation and processing settings associated with the completed example. The download replaces the original input filename with SELECT_YOUR_INPUT.png and uses a neutral output prefix, so choose an image you have permission to use before you run it.
The archive keeps its three canvas workflows separate:
- Baseline: native target 1536, remesh 768, a 700,000-face target, 4096px atlas and UV target, and a 2048px normal bake. This is the route explained first.
- Optional_UNGENERATED_DetailBudget_1536.json: larger post-processing budgets with the same native target, plus a heuristic material-adjustment branch. It has been imported, but has not generated a quality-checked asset.
- Optional_UNGENERATED_Experimental_2048.json: a separate ungenerated experiment beyond the upstream examples’ documented native range. Read its caveats before considering a run.
You’ll also find a README, model locations, required node information, effective-control records, a comparison checklist, and checksums. The archive contains workflow configuration and supporting text only. Model weights, the character input, the generated GLB, and screenshots are not bundled. The figures in this article demonstrate the example without making those creative assets part of the downloadable workflow.
These files use ComfyUI’s normal canvas-workflow format. Open one through the workflow file loader or drag it onto the canvas. They are not API prompt payloads to post directly to a queue endpoint. Read the README first, import the baseline into its own tab, and save your own project copy after selecting the image.
A missing-image warning on first import is expected because the placeholder is not an actual file. It is also worth naming your experiments before running them. A simple subject name followed by “baseline” or “detail test” makes it much easier to match each exported asset to the graph that created it later.
2. What the completed Messi example proves
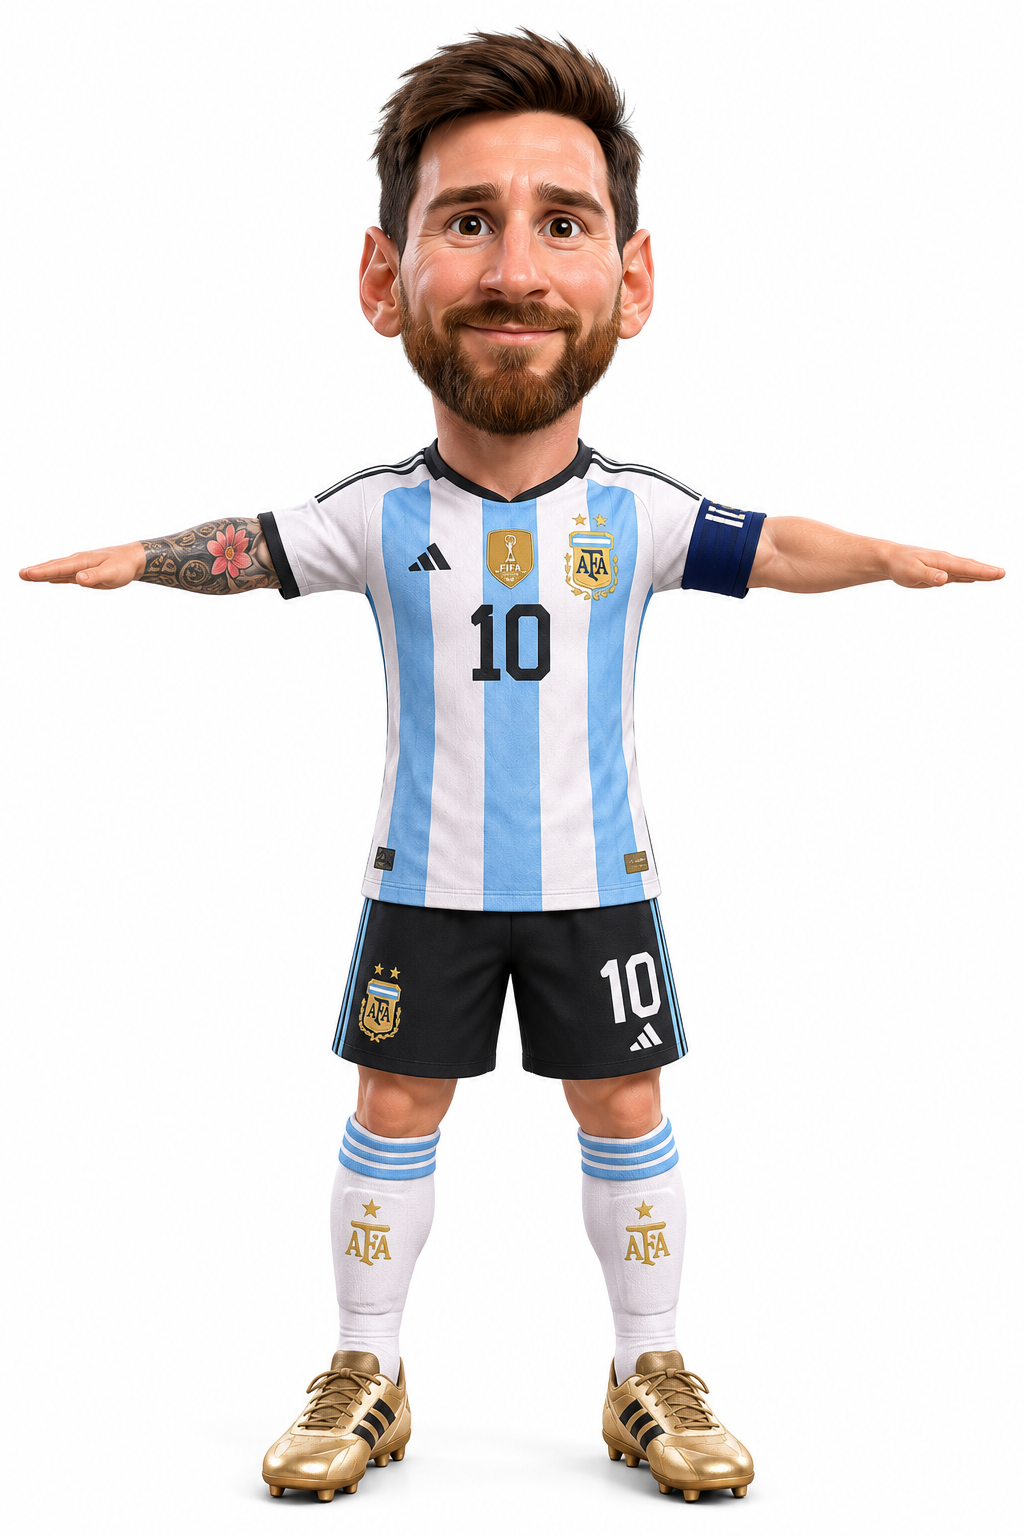
The original reference is a 1024 × 1536 image of a stylized football character wearing an Argentina kit, with arms extended and the full body visible. The stored successful workflow points to that exact reference. Matching the input matters: a similar-looking image or a nearby filename would be a different test.
The saved asset is a real volumetric model. The side view shows depth through the head, torso, legs, and shoes; the back view shows generated surfaces that the input did not directly reveal. At the same time, a single example tells us how this particular combination behaved. It does not establish a success rate across every character, product, or machine.
| Inspected property | Actual baseline result |
|---|---|
| File format | GLB, glTF version 2 |
| File size | 62,266,292 bytes |
| Mesh count | 1 |
| Triangles | 693,873 |
| Vertices | 470,814 |
| Base-color image | 4096 × 4096, embedded PNG |
| Packed material image | 4096 × 4096, embedded PNG |
| Normal image | 2048 × 2048, embedded PNG |
| Skeleton, skin weights, morph targets, animation clips | None found |
The final triangle count is slightly below the graph’s 700,000 target. This is a useful reminder to measure the exported file rather than copying a target setting into a results table. The texture dimensions above were read from the actual embedded images, so they describe the output rather than an intended bake size.
The geometry inspection found finite positions, valid indices, and no degenerate triangles at the inspected area threshold of 1e-14. A separate diagnostic edge check, after welding positions at a precision of one millionth, reported 75 boundary edges and 5,456 non-manifold edges. Those checks do not establish watertightness, absence of self-intersections, or suitability for deformation. The model should not be labeled print-ready, animation-ready, or game-ready on this evidence.
There is enough here to make a practical baseline tutorial: a matched source image, a saved generated asset, measured output properties, and an inspected graph. The higher-detail files remain experiments, so the article never presents their requested settings as completed results.
3. Understand the Pixal3D and TRELLIS.2 branches
This workflow uses the native ComfyUI integration. Its generation nodes come from comfy_extras.nodes_trellis2, with native mesh-processing and export nodes around them. That distinction matters when you search for help: several custom-node projects use the same model names but expose different controls, dependencies, and output behavior. Instructions for one wrapper do not automatically apply to another.
At a practical level, the graph moves through input preparation, image conditioning, sparse structure, shape refinement, texture generation, mesh processing, UV unwrapping, material baking, and export. Each stage answers a different question. Conditioning interprets the reference. Shape stages establish the object. Post-processing changes the mesh representation. Baking transfers appearance to texture images that a viewer can use.
Pixal3D adds camera-related conditioning to this native pipeline. The graph includes MoGe geometry estimation and field-of-view handling alongside the image-conditioning nodes. TRELLIS.2 follows the alternative conditioning branch. You can inspect both branches in the canvas, but the supplied Boolean switch is set to false, selecting Pixal3D. Setting it to true selects TRELLIS.2.
The official ComfyUI Pixal3D tutorial and ComfyUI TRELLIS.2 tutorial are the starting references for this native integration. Use their current templates and model guidance when checking compatibility. The baseline below is an inspected saved configuration of this native pipeline. Use the official instructions for installation and the measured example here for understanding this particular result.
There is also an implementation detail worth keeping straight. The original Pixal3D model card distinguishes its current TRELLIS.2-based release from its paper-implementation branch. This article describes the ComfyUI model package used by the supplied graph. It does not claim to reproduce the paper’s evaluation, benchmark configuration, or reported scores.
4. Check ComfyUI, node support, and model files
The installation inspected for this tutorial reported ComfyUI 0.38.1, frontend 1.53.6, Python 3.12.9, and PyTorch 2.11.0+cu130. These are inspection-time metadata, not a complete record of the earlier generation environment or a claim that every component is a universal minimum. A different installation can expose a different schema, especially while native 3D support is evolving.
Before changing a working installation, save your current workflow and record its versions. If you already have the native Pixal3D template running, compare the required node types first. There is no benefit in installing several similarly named wrappers simply because a search result mentions TRELLIS.2. The provider list in the ZIP identifies where the inspected graph’s actual nodes came from.
Only the optional candidates’ material branch needs ColorToMask from ComfyUI-KJNodes. The 66-node baseline does not contain ColorToMask and does not need that candidate-only branch. The main generation, remeshing, decimation, unwrapping, baking, and save nodes are native in the inspected installation. A missing KJNodes mask node is a different problem from a missing native generation node; identify the type before choosing a fix.
The graph references the following seven model files. Paths are relative to your own ComfyUI/models directory:
| Folder | Filename | Role in this graph |
|---|---|---|
| diffusion_models | pixal3d_int8_convrot.safetensors | Pixal3D generation model |
| diffusion_models | trellis_2_int8_convrot.safetensors | TRELLIS.2 alternative model |
| vae | trellis_2_shape_vae_bf16.safetensors | Shape VAE |
| vae | trellis_2_texture_vae_bf16.safetensors | Texture VAE |
| clip_vision | dino_v3_L_naf_fp32.safetensors | Vision encoder |
| geometry_estimation | moge_2_vitl_normal_fp16.safetensors | Geometry and camera-related estimation |
| background_removal | birefnet.safetensors | Background-removal model |
These are the seven filenames referenced by the matched baseline graph and its inventory. For your own setup, use the official Comfy-Org Pixal3D package, Comfy-Org TRELLIS.2 package, and the model links in the official tutorials. Match the actual filename and folder rather than renaming an unrelated checkpoint to satisfy a dropdown.
No measured minimum VRAM figure is established for this baseline or the optional candidates. Quantized model weights do not describe the memory needed by the whole graph. Remeshing, texture images, intermediate geometry, and baking can all contribute. Begin with the baseline, check how it behaves on your machine, and measure larger candidates separately. A successful import alone cannot tell you whether the complete job fits in memory.
The workflow download is free. Check upstream model and dependency terms for your intended use, and use images you own or are authorized to process. A free JSON download does not grant rights to a celebrity likeness, team mark, source image, or third-party model. The package keeps the example character assets out of the public workflow archive.
5. Choose and inspect your input image
A larger texture atlas cannot rescue information that is absent from the reference. Choose a single clearly separated object or character, with enough space around its outline to avoid cutting off thin parts. A cluttered scene makes it harder to decide which surfaces belong to the intended asset. Strong shadows can also look like markings or surface changes once they are interpreted as appearance.
For your first run, use an image you own or are licensed to use. Keep the same file for the baseline and candidate. If you change the image, the camera angle, and the mesh budget together, an improvement or regression becomes difficult to explain. Save the reference alongside your own experiment notes so you can reproduce the comparison later.
Check small features before spending compute time. Are both hands visible? Is the edge of a shoe lost against the background? Does hair merge into a jacket? Are the eyes large enough in the reference to show what you want? A model may plausibly invent obscured details, but plausible and accurate are different standards. Decide which one your project requires.
The supplied graph includes background removal and a crop-to-mask stage. In the inspected JSON, the crop stage uses a 1024 by 1024 target with padding-related controls already set. Inspect the resulting image and mask previews rather than assuming the foreground extraction is correct. A missing strap or chopped strand at this stage will not be restored simply by giving the final mesh more triangles.
Single-view generation also leaves the back and hidden surfaces underdetermined. Review those areas as generated interpretations. If your intended use requires exact unseen product dimensions, brand details, or character costume features, this workflow alone does not provide the evidence to confirm them. Choose a different capture or modeling process when exact reconstruction matters.
For the first technical test, a simple isolated prop is often easier to inspect than a full-body character with thin fingers, layered clothing, and complex hair. That is an experiment-design suggestion, not a measured claim that one subject category always performs better. Start with something whose errors you can recognize, then make the test harder.
In the worked example, the white background and separated limbs make the outline easy to inspect. The portrait itself is taller than the crop stage’s 1024 × 1024 working canvas. Those dimensions describe different parts of the pipeline: the uploaded image can be rectangular, while preprocessing produces the square image used downstream. Keep an eye on the processed preview so the subject remains complete.
6. Import the baseline and verify the canvas
- Save your current project. Keep an untouched copy of any graph, texture edits, or generated assets you already rely on.
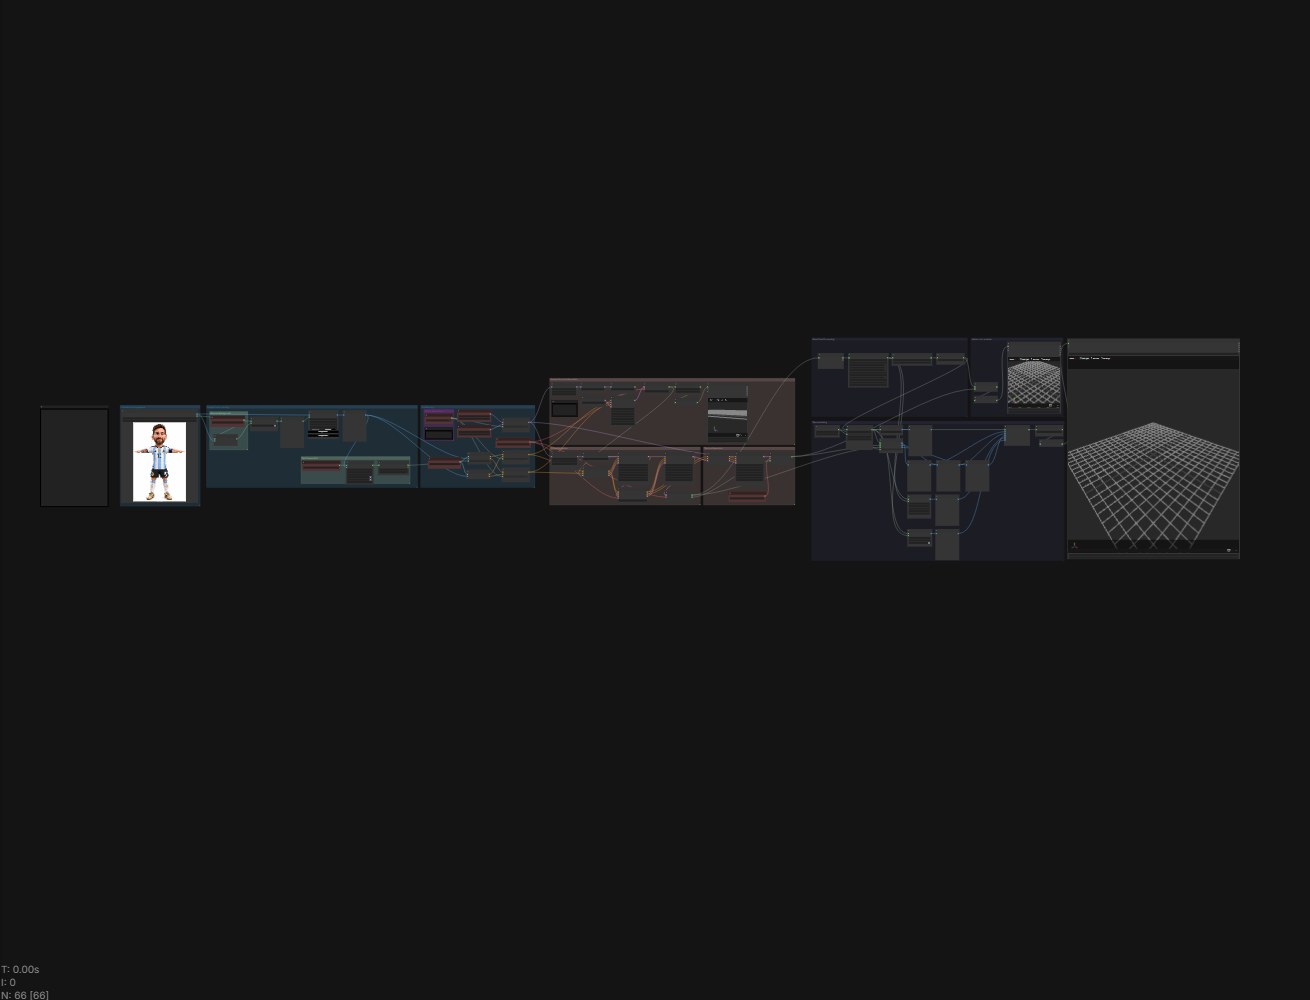
- Open the baseline JSON from the ZIP. Use ComfyUI’s normal workflow loader. The inspected baseline has 66 nodes and 100 links. The optional 79-node graphs are different files.
- Select your image in Load Image. Replace
SELECT_YOUR_INPUT.pngthrough the interface. Use the application upload flow if your browser and ComfyUI server are on different machines. - Check missing nodes and model dropdowns. Resolve the exact class or filename reported. Compare with the model list above before installing a similarly named wrapper.
- Confirm the model switch. Leave “Boolean (Switch to Trellis2)” false to follow the Pixal3D baseline. True selects the alternative TRELLIS.2 model and conditioning branch.
- Inspect the linked texture control and output destination. The baseline texture integer should be 4096. Give the output a recognizable, non-overwriting prefix.
- Save your project copy. Record the input, model branch, and effective values before queueing.
The sanitized evidence graph was opened in an actual ComfyUI interface. It loaded with the expected node and link counts and an empty recorded browser-error list. No job was queued during that import inspection. The empty 3D preview panels in the screenshot are therefore expected; the finished model shown elsewhere was loaded separately from its existing GLB.
The public copy makes non-generating changes such as replacing the original image selection and output label. Those edits let readers choose their own inputs without publishing machine-specific data. The generation settings and processing links remain tied to the baseline. The final public copies passed static JSON, link, settings, and privacy checks; they were not newly imported into a live interface or executed. The earlier UI import applies to the source evidence graph. Import the public copy in your own installation before running it.
If your interface differs from the screenshot, compare node class names and software versions first. Display labels can change, and newer templates can contain extra controls. Copying the visual layout is less important than confirming that the graph has the expected providers, inputs, and connections. Do not paste an unsupported control value into JSON just to make a screenshot look familiar.
7. Use the exact working baseline settings
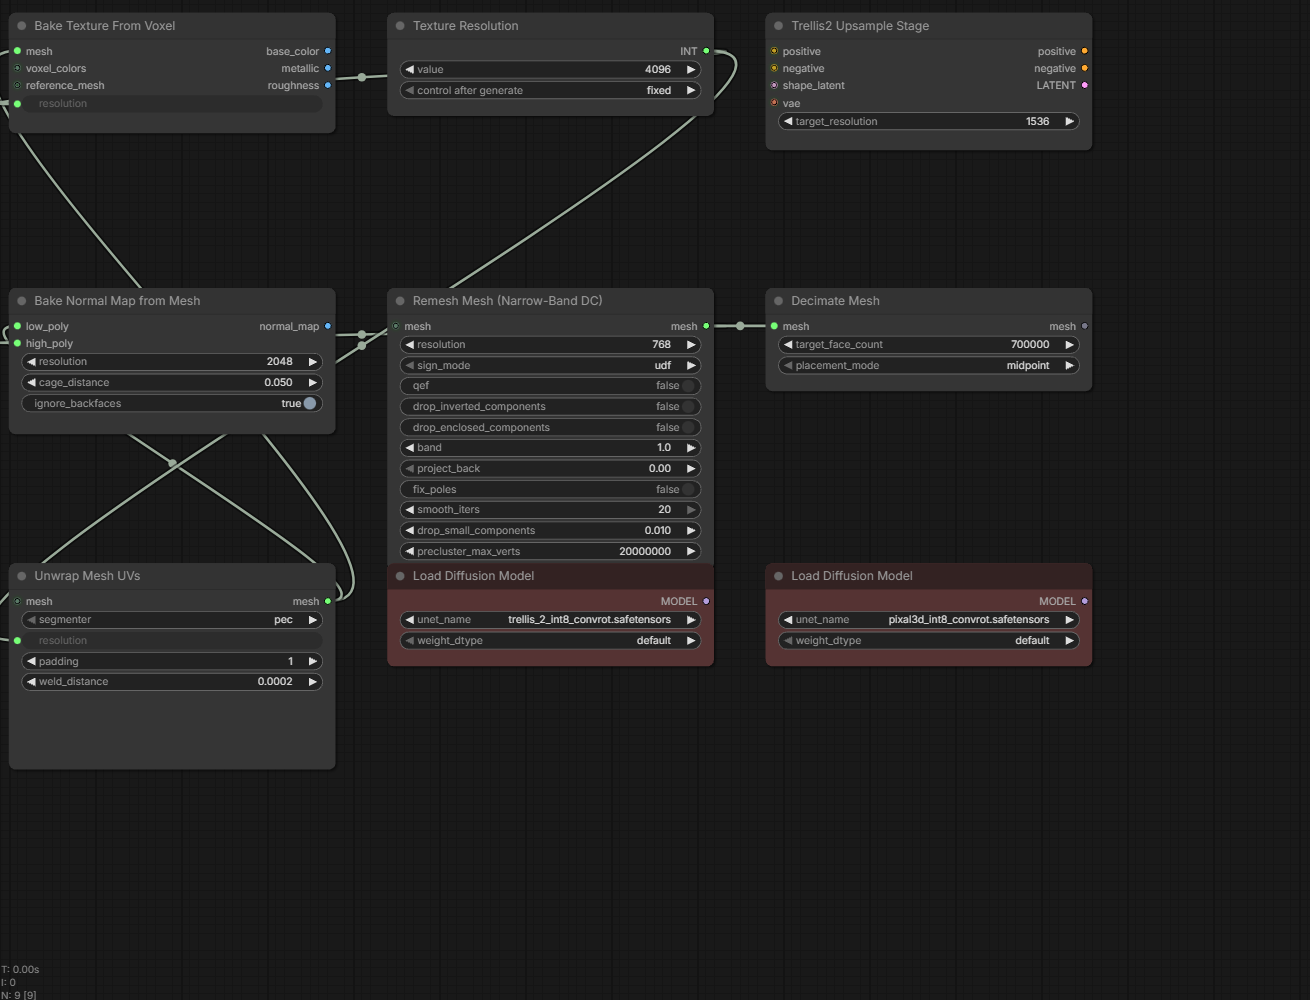
Here are the effective settings associated with the inspected output. “Effective” means the value that reaches the node, including any incoming connection. Several local widget values in an older saved graph can remain visible even when a linked integer supplies a different value.
| Control | Baseline value | Where to look |
|---|---|---|
| Model branch | Pixal3D | Boolean node 316: false |
| Native cascade target | 1536 | Trellis2UpsampleStage node 94 |
| Remesh resolution | 768 | RemeshMesh node 241 |
| Decimation target faces | 700,000 | DecimateMesh node 186 |
| Texture atlas target | 4096 | PrimitiveInt node 288 feeding bake node 147 |
| UV target resolution | 4096 | Node 288 feeding UnwrapMesh node 196 |
| Normal bake resolution | 2048 | BakeNormalMapFromMesh node 224 |
| UV padding | 1 pixel | UnwrapMesh node 196 |
| Ambient-occlusion bake target | 1024 | Separate AO bake control |
The remaining remesh settings are UDF sign mode, QEF disabled, inverted- and enclosed-component dropping disabled, band 1, project-back 0, pole fixing disabled, 20 smoothing iterations, small-component cutoff 0.01, and a precluster cap of 20,000,000 vertices. Decimation uses midpoint placement. UV unwrapping uses PEC segmentation with weld distance 0.0002.
The normal bake uses cage distance 0.05 and ignores backfaces. Its high-poly input and the texture bake’s dense reference-mesh input remain connected. Leave those links in place for the first run. Increasing a headline number while disconnecting a reference surface would change two things at once and make the result harder to diagnose.
You do not need to memorize every number. Save the downloaded baseline as your reference and use the table to catch accidental changes. For a first attempt, keep the neural sampling, remeshing, UVs, and material wiring together. Once you have a completed output of your own, make a named copy for each deliberate experiment.
8. Follow connected values instead of stale widgets
The baseline contains a small trap worth learning from. The saved local widgets on the texture-bake and UV-unwrap nodes show 2048, but both relevant inputs are linked to PrimitiveInt node 288, titled Texture Resolution. That upstream node supplies 4096.
The actual baseline GLB confirms 4096 × 4096 color and packed material images. Reading only a stale 2048 widget would give you the wrong starting point. If you then changed a different display to 3072 and called it an upgrade, you could actually be lowering the effective atlas resolution.
To check the value, locate the bake’s texture-size input, follow its incoming line, and read the shared integer. Repeat that check for the unwrap node. Both should lead to the same 4096 control in the baseline. The normal bake is separate and stays at 2048. Native upsampling is separate again and stays at 1536.
The camera control follows the same rule. Pixal3D conditioning receives its camera angle from the MoGe field-of-view node. A saved local value such as 49.13 is overridden by that link, so it should not be presented as a fixed camera setting for every image. Preserve the connection and let the current input drive the estimate.
This distinction also explains why “resolution” is an incomplete description of a test. Native cascade resolution belongs to the shape-generation stage. Remesh resolution controls a surface-reconstruction grid. Atlas resolution describes image dimensions over the UV layout. The normal-map resolution controls a different image. Write down the actual control name whenever you compare runs.
A linked input can affect seeds, selectors, dimensions, and other values throughout ComfyUI. The habit is the same: trace the connection rather than trusting the downstream display alone. Keep a screenshot of the effective control and a copy of the saved graph so you can explain what changed later.
9. Run the baseline from image to exported GLB
Once the image, models, nodes, and baseline settings are in place, save the graph and queue one run through ComfyUI. Allow the stages to finish before deciding whether the asset is usable. An early structure preview can look much rougher than the final textured mesh, while a convincing intermediate preview can still be followed by an export failure.
Start by checking preprocessing. Background removal and crop-to-mask should preserve the subject’s outline. Look for missing fingertips, clipped shoe tips, or holes in hair. If the processed image already removes part of the character, stop and fix that input-stage problem before spending time on larger mesh budgets.
The Pixal3D branch uses image conditioning with camera-related geometry and field-of-view estimation. Structure generation establishes a coarse arrangement, shape stages refine it, and texture generation supplies appearance information. Mesh processing then rebuilds and simplifies the surface before UV unwrapping and baking prepare the final material. You can follow progress through those groups without treating every intermediate mesh as the finished asset.
Keep the four recorded KSampler settings intact for the first reproduction attempt:
| KSampler node | Seed | Steps | CFG | Sampler | Scheduler | Denoise |
|---|---|---|---|---|---|---|
| 12 | 43 | 12 | 1 | euler | normal | 1 |
| 18 | 42 | 20 | 7.5 | euler | normal | 1 |
| 3 | 56 | 12 | 7.5 | euler | normal | 1 |
| 23 | 42 | 12 | 7.5 | euler | simple | 1 |
These values document this saved workflow; they are not a claim of optimal settings. The graph also includes CFG override and rescale connections, so copying only the sampler table into an unrelated graph will not reproduce the same conditioning. Fixed seeds help keep comparisons organized, but a software or model change can still affect the result.
When the full job completes, locate the file reported by Save3DAdvanced. The original baseline used a relative 3D output prefix; the public download uses a neutral baseline prefix documented in its README. Let the application tell you the actual saved filename, including any automatic suffix. Do not grab an older export merely because its name looks similar.
Open that GLB in the intended viewer and rotate it. Confirm that it contains geometry, that textures appear, and that the saved file represents the completed run. Save the exact graph beside your project records along with the input identifier and output filename. This small amount of bookkeeping makes later texture or topology problems much easier to trace.
If a stage fails, record the stage name and error before changing settings. A missing model, an unsupported node input, and an out-of-memory error need different fixes. There is no measured time estimate in this tutorial, so a slow run alone does not establish that it is stuck. Check progress and logs rather than repeatedly queueing duplicate jobs.
10. Review the actual front, side, and back result
The baseline comparison is useful precisely because you can inspect more than the most flattering front angle. The front retains the character’s main appearance: the striped kit, the extended-arm pose, dark shorts, socks, and gold-colored boots. The side view confirms a three-dimensional head and body. The back shows how much the generator had to infer from a single front reference.
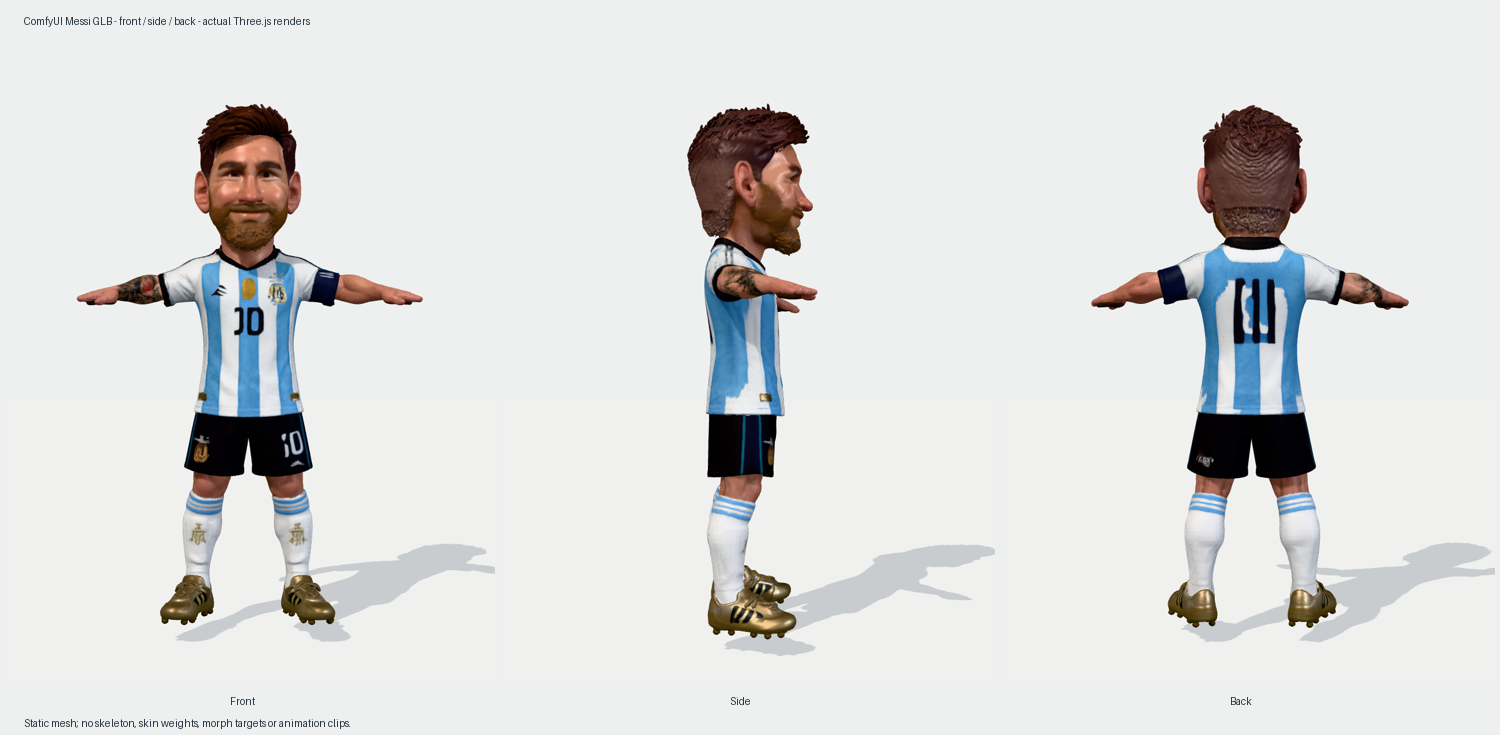
Look closely at the hands. They are simplified and mitten-like rather than articulated fingers with deformation-ready structure. The beard and hair have rough, lumpy detail. The back shirt number is distorted, and texture artifacts remain around parts of the character. Increasing triangle count would not by itself tell the system the correct lettering or anatomy.
For your own asset, make front, side, back, and three-quarter views under consistent lighting. Add close-ups of the details that matter for the project. A full-body thumbnail can hide defects that dominate a close-up portrait, while a tiny seam might be irrelevant for a distant background object.
Next, separate appearance from structure. A neutral shaded view helps reveal the underlying form. Compare it with the textured view, then inspect how the normal map changes shading if your viewer allows that. A dark patch might come from base color, material response, geometry, or a baked normal. Fixing the wrong stage wastes time and can damage something that was already acceptable.
The measured asset contains no skeleton, joint or weight attributes, morph targets, or animation clips. Its extended-arm pose does not change that. Pose, rigging, and animation readiness are different properties. If the next project requires walking, facial expression, or lip-sync, plan topology, rigging, skinning, and deformation tests as additional work.
Keep your acceptance criteria specific. “The front looks recognizable at this camera distance” is a useful observation. “The character is ready for any game or animation pipeline” requires evidence this example does not provide. The goal is to keep the parts that work while identifying exactly what still needs attention.
11. Understand remeshing, smoothing, and triangle budgets
Remeshing rebuilds the surface representation. Decimation reduces complexity toward a target budget. Smoothing changes how local surface variation is retained. They are related, but they are not interchangeable ways to make a model “better.”
The baseline uses UDF mode in the native narrow-band remesher. Its installed schema describes UDF as suitable for messy or non-manifold input. That is a reason to inspect this mode for generated meshes, not a guarantee that every output becomes watertight, printable, or free of self-intersections. Validate the resulting asset for its intended destination.
The baseline remesh grid is 768. An optional candidate later in this tutorial raises it to 1152, but no output from that change has been measured. How much useful detail survives also depends on the incoming surface, smoothing, and the later decimation target. If the source contains a misplaced lump, a finer reconstruction may preserve that lump more faithfully. Higher fidelity to an imperfect source can still be the wrong result for your project.
The retained smoothing value deserves particular attention. Twenty iterations is the upper value in the inspected schema, and the schema warns that increased smoothing can soften features. It is part of the saved baseline configuration. That does not make it the ideal setting for every face, accessory, or hard edge.
If your completed output looks too soft, a lower smoothing value is a sensible separate experiment. Save it as another named variant and change only that control. Do not silently combine it with the larger-budget preset and then attribute all differences to remesh resolution. A useful test tells you which change helped, not merely that two files look different.
The decimator’s midpoint placement remains unchanged. Its target is a simplification budget, so check the final face count rather than assuming the label is an exact output count. This example requested 700,000 and exported 693,873 triangles. Also keep the intended destination in mind. A million-face review asset may be useful for inspection or later baking, while a real-time character can require a different topology and substantially different budgets. This graph does not perform deformation-aware retopology.
Thin accessories, isolated fragments, and layered surfaces deserve close inspection. The small-component cutoff can remove small disconnected pieces; retained inner surfaces can create their own problems. The right setting depends on whether a small part is meaningful geometry or a generation artifact. There is no universal threshold that knows the difference for every input.
12. Check UVs, material textures, and normal maps
The baseline atlas and UV target both receive 4096 from the linked integer. The generated asset contains a 4096px base-color image and a 4096px packed material image. The 2048px normal map is intentionally separate. A large color map does not imply every material channel was originally baked at the same resolution.
UV unwrapping runs after the relevant mesh-processing stages. It assigns portions of a two-dimensional atlas to the surface. Bigger atlas dimensions provide more available texels, but the layout still determines where they go. A large empty region, excessive chart fragmentation, or small UV allocation for the face can waste much of the additional capacity.
The baseline padding is one pixel. The optional detail candidate changes it to two pixels at its larger atlas target. It should be reviewed as a seam-management setting, not advertised as a quality multiplier. Whether it is adequate depends on the layout and how the asset is sampled downstream. Check distant views as well as close-ups, because texture filtering can reveal seams differently.
The texture bake keeps its dense reference-mesh input connected. The inspected node schema describes that optional input as a way to project texture samples back toward the denser surface before sampling. Preserving the connection is important when you simplify geometry but still want the bake to follow the richer reference surface.
The baseline normal map has its own 2048 target and its own cage settings. Compare a neutral shaded view with the normal map enabled and disabled. If a dark band disappears when the normal map is disabled, investigate the bake, cage, normals, and viewer interpretation before concluding the underlying geometry is broken.
Ambient occlusion has a separate bake target too. In the baseline and optional graphs, that target is 1024. The native ApplyTextureToMesh implementation packs ambient occlusion, roughness, and metallic into the red, green, and blue channels of an ORM image, resizing them to the largest supplied dimensions. A 1024 AO bake can therefore occupy a larger packed image without gaining new source detail. Record both the bake targets and the exported image dimensions.
Finally, keep base color separate from lighting judgments. A bright studio environment can make roughness problems obvious, while a dark dramatic environment can hide them. Use consistent lighting for comparison and inspect the individual maps. Otherwise, a change in presentation can look like an improvement in the model itself.
13. Know what the baseline does not repair
Eyes are a good example of why diagnosis matters more than simply raising every budget. Several different defects can look similar in a small preview: a reddish iris painted into base color, a dark rim in the texture, an actual raised ring in the mesh, a normal-map artifact, or unsuitable reflections from the material.
Start by separating those channels. Inspect the base-color image on its own. Look at the model with a neutral material. Compare the geometry silhouette and a close-up shaded view. Then re-enable the normal map and final material. The stage at which the defect appears tells you where to investigate.
The optional material branch later in this tutorial changes selected metallic and roughness values; it does not repair eye texture, eyelid geometry, or gaze. No universal supported eye-fix setting was established during the preparation of these presets. Larger maps may provide more room for texture information, but more room does not decide what the correct iris or eyelid should look like.
Hand-painted eye corrections from an older export should also be treated carefully. A new unwrap can move the eye region to different pixels. A regenerated mesh can change vertex ordering and topology. An old UV mask or vertex-based correction cannot be assumed to map onto the new asset just because both models depict the same character.
Keep any finished texture repair, rig, and morph work from your existing asset safely separate before regenerating. If you need to transfer it, plan and validate that transfer as its own step. This tutorial does not claim that the downloadable workflow preserves an existing facial rig, fixes eyelids, transfers blendshapes, or creates animation-ready eyes.
That limitation is useful when planning a project. For a distant prop, a small eye defect may never matter. For a close-up speaking character, it can dominate the result. Set the acceptance standard from the intended camera distance and use, rather than judging every asset by its thumbnail.
14. Optional: inspect the ungenerated detail-budget candidate
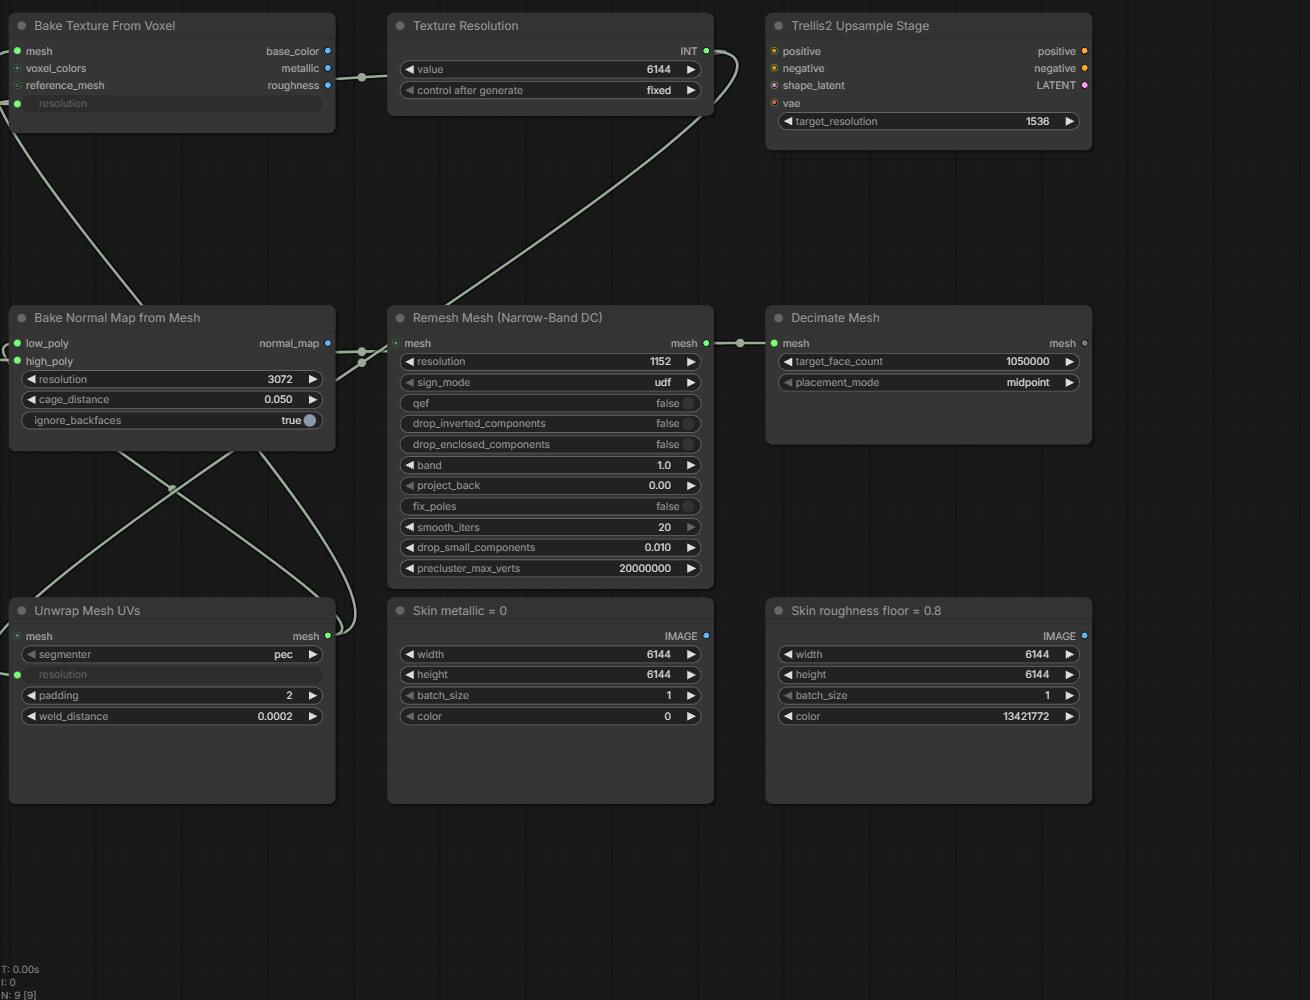
After completing and reviewing your own baseline, you can decide whether to test larger processing budgets. The optional 1536 candidate keeps the native cascade target fixed and raises remeshing, decimation, atlas, and normal-map settings. Several requested values are multiplied by 1.5, which explains the earlier “1p5” shorthand used in the source preset. The public download labels the file Optional_UNGENERATED_DetailBudget_1536.json so its status is clear.
This candidate has not generated a verified mesh. It was imported into ComfyUI, and its controls and connections were checked. There is no higher-detail output to place beside the Messi baseline, no measured quality gain, and no measured time or memory comparison. The screenshot below shows settings only.
| Control | Working baseline | Optional 1536 candidate |
|---|---|---|
| Native cascade target | 1536 | 1536 |
| Remesh resolution | 768 | 1152 |
| Target faces | 700,000 | 1,050,000 |
| Linked atlas and UV target | 4096 | 6144 |
| Normal bake | 2048 | 3072 |
| UV padding | 1 | 2 |
| Heuristic material-edit branch | Absent | Present, unvalidated on an output |
A 1.5-times increase in texture edge length means 2.25 times as many texels in that image. A 1.5-times face target is a 50 percent increase in the requested triangle budget. Neither calculation measures visual quality, and neither gives a reliable multiplier for whole-workflow memory or runtime.
The candidate also contains an additional material branch. That means the full candidate versus the baseline is not a pure test of mesh and texture budgets alone. For a clean experiment, change one budget in a copy of the baseline, or keep material processing identical on both comparison runs. Otherwise a change in roughness could make the surface look different even when geometric detail does not improve.
The baseline’s other remesh options, smoothing value, decimator placement, unwrap method, and normal cage settings remain in the supplied candidate. Its shared atlas integer and material constant images use 6144. Check those linked controls before running, and inspect the actual exported dimensions afterward. At present, 6144 and 3072 are requested candidate bake sizes, not measured candidate output sizes.
15. Optional: understand the unvalidated matte-material branch
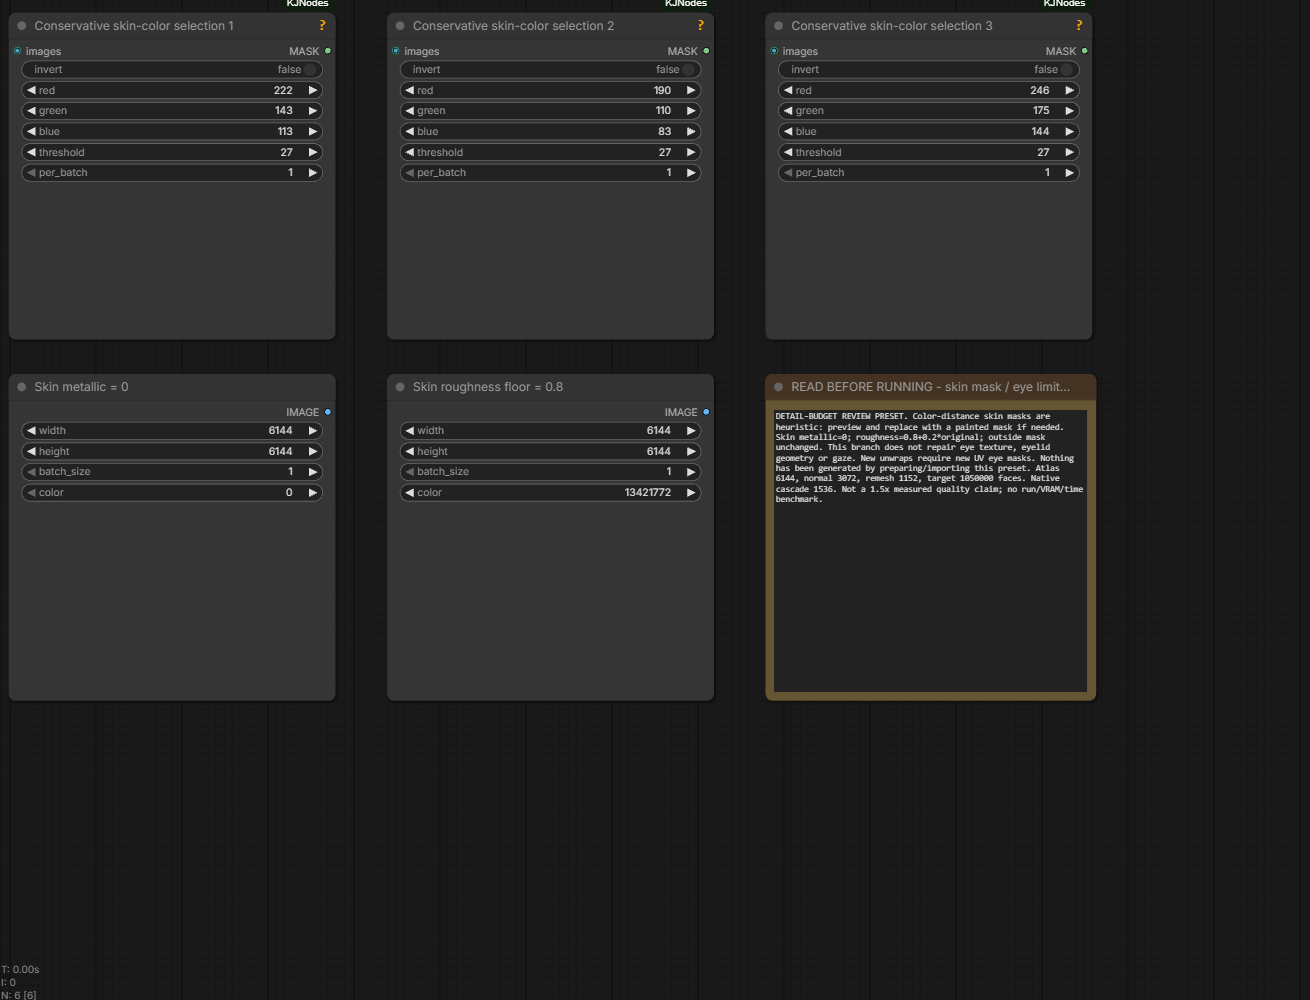
Only the optional candidates include a localized material adjustment intended to make selected skin-colored regions less metallic and more matte. It uses three RGB-distance selections and combines their masks. The example colors are (222, 143, 113), (190, 110, 83), and (246, 175, 144), each with threshold 27.
The KJNodes mask implementation compares RGB distances. These values describe a color heuristic. They do not identify skin by meaning, anatomy, or identity. A similarly colored shirt can be selected. Skin in a deep shadow can be missed. A different complexion, stylized palette, colored lighting, makeup, or texture exposure can make the example thresholds unsuitable. Review the mask for your own asset rather than treating the numbers as universal.
Inside the selected region, metallic is replaced with zero. Roughness is changed using the screen-blend relationship shown in the graph: 0.8 plus 0.2 times the original roughness. For example, an original roughness value of 0.5 becomes 0.9 under this operation. That is an explanation of the formula, not a measurement taken from a newly generated texture.
Outside the mask, the existing material values remain. Base color, ambient occlusion, normal mapping, and geometry are not repaired by this branch. It changes how selected surfaces respond through their metallic and roughness channels. If a face looks wrong because its color texture contains a dark painted ring, making the material matte will not remove that ring.
Open the mask preview and inspect the face, ears, hands, neck, and nearby clothing. Look for both false positives and missed regions. If precise control matters, create a deliberately painted or otherwise appropriate semantic mask for the current UV layout using a tool you already trust. That is a separate asset-editing task and should be reviewed on its own.
The detail screenshot is a six-node review arrangement of real imported controls. It shows the example selectors and constants clearly, but it does not show successful selection on a new output. The optional full graphs contain the connections used for composition. This branch is absent from the executed 66-node baseline, so the actual Messi output does not demonstrate its effect.
16. Optional: treat native 2048 as an experiment
The separate experimental file changes the native upsample target to 2048. The inspected Trellis2UpsampleStage schema accepts integer targets from 1024 through 2048 in steps of 128. That makes 2048 an accepted control value in this installation.
Multiplying 1536 by 1.5 gives 2304, which is outside that observed range. The experimental file requests 2048, approximately 1.333 times 1536 on a linear basis. Native 2304 is unsupported by this inspected schema.
An accepted target is still different from an observed completed run. Microsoft’s TRELLIS.2 documentation and examples include native generation through 1536. The 2048 request goes beyond the range established by those documented examples even though the inspected ComfyUI control accepts it. Checkpoint-specific inference at 2048 has not been established here. This is an experiment, not an upstream-validated quality level. Inspect the actual run configuration and output before describing what the candidate achieved.
Consider the experimental file only after completing a workable baseline and understanding the optional 1536 candidate. Keep the same input, model selection, seeds, and post-processing settings when comparing the two. Record whether the run completes, the effective native resolution, stage timings, peak memory, and the final asset characteristics.
No runtime or VRAM result is provided for this option. There is also no evidence here that it improves every subject. A higher request could produce a useful difference, a negligible difference, a regression, or a failure on a particular setup. The purpose of the separate filename is to keep that uncertainty visible.
If you need a dependable production asset today, an unrun maximum setting is a poor substitute for a known-good output. Use experimental presets to answer a specific question, save the evidence, and keep the proven version available while you evaluate them.
There is another important implementation limit: the inspected Trellis2UpsampleStage function assigns the requested resolution and quantizes the coordinates once. It contains no automatic token-budget downshift loop. An older comment about searching for a fitting resolution does not establish that behavior. Do not rely on the node to lower an over-ambitious request automatically. The native node source is the relevant upstream implementation reference; verify your installed version when testing.
17. Measure an improvement before keeping it
The most valuable next step is a controlled comparison, not a larger list of speculative tweaks. Begin with a baseline that already works on your machine and save its effective configuration. The actual Messi result gives this article a measured starting point, but you still need a completed reference run for your own image and hardware.
Keep the input image, model branch, seeds, samplers, conditioning, camera-related settings, and material handling fixed for a clean comparison. The baseline sampler values are listed in the run section. Save a new graph for each experiment so you can return to the completed reference.
The graph includes CFG override and rescale nodes. Keep those connections intact along with the sampler settings. Replacing a model or changing a conditioning branch at the same time as a texture budget would make the comparison harder to interpret.
For each run, record the software versions, GPU and available memory, exact workflow file, input identifier, model files, effective native target, completion status, and any warnings. Record wall-clock time and stage times when your tooling exposes them. Note whether a run reused cached stages, because cached and full fresh executions are not comparable timing measurements.
Then make consistent views: front, side, back, three-quarter, and close-ups of the features that matter. Match the camera, lighting, material settings, and zoom. Include a neutral shaded view as well as the final textured view. Check the silhouette, small separate parts, face, hands, UV seams, and hidden surfaces.
Decide what counts as a useful improvement before comparing. For example, you might care about retaining a thin handle without introducing new holes, or reducing visible texture softness at a particular camera distance. A candidate that uses more memory and saves a larger file without improving the intended view may not be worth keeping.
The ZIP includes a simple checklist you can fill in. Empty measurements are deliberately empty. Replace them only after an actual run. Keep unsuccessful runs in your notes too; a failure at the baking stage is valuable evidence about where the budget becomes impractical.
18. Troubleshoot common ComfyUI image-to-3D problems
The JSON opens, but Load Image is red
Select your own image. The download intentionally refers to a neutral placeholder rather than bundling a personal reference. Check that the selected file is available to the ComfyUI instance you are using. A browser on one machine and a server on another can have different file access, so use the application’s supported image upload or selection flow.
ComfyUI reports a missing node
Read the exact class name. For ColorToMask, first check whether you opened an optional candidate; that class is not part of the baseline. The candidates use KJNodes for this branch. For native Trellis or mesh-processing types, compare your ComfyUI version and available node registry with the official native tutorial. Installing an unrelated wrapper will not necessarily provide a class with the same name or compatible inputs.
The model loader cannot find a checkpoint
Check the folder, complete filename, and download completion. The seven files in the table belong to different model directories. Refresh model lists or restart using the documented process for your installation if a newly downloaded file has not appeared. Do not replace a missing weight with a different model simply because its name contains “Trellis.”
The texture size seems to ignore my edit
Follow the incoming link. In this graph, the shared Texture Resolution integer drives the bake and unwrap. An inactive widget can mislead you. Inspect the effective prompt inputs and update the actual upstream control. If you are using an optional candidate, also check its matte constant-image dimensions when changing the main atlas size.
The larger preset runs out of memory
Record the stage that failed and return to a known-working configuration. Avoid changing several unrelated controls at once. A failure during native sampling calls for a different investigation from a failure during remeshing or baking. Do not assume the native upsample stage will downshift itself to fit. Lower the relevant budget in a separate copy, then test again. No tested low-VRAM profile is included in this package.
The mesh is denser but still soft
Compare the incoming surface, retained smoothing, and final decimation. More triangles may preserve an already smooth shape rather than add meaningful features. Test a lower smoothing value separately if the surface appears over-smoothed, and inspect whether the reference image actually contains the detail you expect.
The skin mask selects clothing or misses part of the face
In the optional candidates, that is a known limitation of color-distance selection. Preview the mask and adjust it for the current texture, or use a deliberately authored mask when precision matters. Do not assume the three supplied RGB colors cover every complexion or lighting condition. Keep the unmodified material available for comparison.
The eyes still look wrong
Identify whether the defect is in base color, geometry, normals, or material response. Neither the baseline nor the optional material branch contains an eye-repair operation. A higher atlas target does not remove a painted defect, and a higher remesh target does not correct eyelid anatomy. Keep any manual eye repair separate and validate it against the current UV layout.
The experimental file accepts 2048, but the result is uncertain
Keep the log and inspect the actual effective configuration and output. Schema acceptance does not establish quality beyond the model’s documented range. Report the requested setting alongside what you actually observed. If the run never completes, record a failed experiment rather than an achieved high-resolution asset.
19. Frequently asked questions
Is there an actual generated result behind this workflow?
Yes. The baseline is matched to a previously completed Messi-inspired character GLB and its recorded input. The asset was inspected and rendered from multiple directions. The later import check did not generate another copy. The two optional candidates have no verified generated output.
Is this a free ComfyUI image-to-3D workflow download?
The JSON package is free to download and is designed around local model files. You provide the hardware, storage, and setup. Model weights and the example character assets are separate. Check the relevant model terms and your rights to the input and intended output use.
Does false select Pixal3D or TRELLIS.2?
In this graph, false selects Pixal3D and true selects TRELLIS.2. The switch changes both the model path and conditioning. The measured example used the false/Pixal3D selection. A TRELLIS.2 run is a separate experiment, even if the rest of the graph stays the same.
Why is the texture 4096 if a widget shows 2048?
The bake and unwrap inputs are connected to the shared Texture Resolution integer. That integer supplies 4096 in the baseline, overriding the stale local displays. The actual baseline GLB contains 4096px color and packed material images. The normal map is independently baked at 2048.
Is the model rigged because it is in an extended-arm pose?
No. The inspected GLB has no skeleton, skin weights, morph targets, or animation clips. A pose that resembles a rigging reference does not supply a rig or prove deformation-friendly topology. Animation requires additional preparation and testing.
Does “1p5” mean 50 percent better visual quality?
No. It describes selected numeric budget increases in an optional preset. The candidate has not produced a verified result, so no improvement has been measured. Texture edge length, texel count, triangle budget, and perceived quality are different quantities.
Can I set the native target to 2304?
The inspected native upsample schema accepts 1024 through 2048 in steps of 128. A value of 2304 is outside that range. The experimental 2048 file is accepted by the schema, but successful checkpoint-specific inference and useful quality at that target remain unproven here.
How much VRAM and time does this workflow need?
No measured full-run timing or peak-VRAM result accompanies this example. The observed output proves that a run completed previously, but it does not establish a hardware minimum. Record the stages and memory behavior on your own setup before increasing budgets.
Will the optional material branch fix skin and eyes?
It changes metallic and roughness values under an RGB-distance mask. That mask can select the wrong regions or miss intended ones. It has not been validated on a generated candidate, and it does not correct iris color, eyelid geometry, gaze, or base-color defects.
Can I use an old corrected texture on a fresh export?
Only after checking the UV layout and transfer. A new unwrap can move the relevant surfaces to different pixels, and regenerated topology can change vertex ordering. Preserve the finished asset and validate any transfer separately rather than assuming files for the same character are interchangeable.
Are these real screenshots and renders?
Yes. The output figures render the existing generated GLB, and the input is the matched reference. The canvas figures come from actual ComfyUI imports. The readable control excerpts rearrange real nodes and omit some links, so use the complete downloaded graphs for execution.
20. Choose your next step from the actual result
Start with the baseline, choose an authorized image, confirm the linked 4096 atlas value, and complete a run before experimenting. Inspect the saved GLB from every side and measure what it actually contains. The Messi example shows that this pipeline can produce a substantial textured static model while still leaving important cleanup work.
Then choose one problem worth solving. If the silhouette is wrong, look at the input and generated shape. If the surface is too smooth, examine remeshing and smoothing. If the appearance is soft, inspect UV allocation and the texture bake. If the issue only appears under certain lighting, compare material channels. A targeted adjustment gives you more useful information than pushing every setting to its maximum.
The optional larger-budget files are available for that investigation, with their ungenerated status kept visible. Save the completed baseline, record each change, and keep a candidate only when the inspected output helps your actual use case. A bigger file alone is not evidence of a better asset.
Get the baseline workflow and separate optional experiment files, then follow the README’s reproduction checklist.
Sources and evidence: the exact baseline settings, matched input, import counts, geometry measurements, and image dimensions come from the inspected workflow and existing GLB recorded on 18 October 2026. The workflow archive includes effective-control and measurement summaries without redistributing the input or model. For current upstream setup, see the official Pixal3D tutorial, official TRELLIS.2 tutorial, Pixal3D model card, and Microsoft TRELLIS.2 repository. Node behavior should be checked against the version installed on your own machine.
If you are turning the result into a narrated asset showcase, the Voicebox local AI voice tutorial covers the separate narration workflow. For video-generation approaches, see the local AI video models guide; neither route adds a rig to this static GLB.