Github is used to track code changes and manage issues for an application. It helps to maintain a history of code changes by multiple team members and contributors. Using git versioning we can travel back in time to fetch the old version of code.
In this article, we will go through steps to quickly set up Git versioning in the Angular project.
Let’s start from scratch by creating a new Angular project.
Step 1) Create a new Angular project
Using NG CLI tool, make sure you have installed the latest version by running below code:
$ <span class="pln">npm install </span><span class="pun">-</span><span class="pln">g </span><span class="lit">@angular</span><span class="pun">/</span><span class="pln">cli</span>
create a new project by running following command in the terminal window:
$ <span class="pln">ng new my</span><span class="pun">-</span><span class="pln">git</span><span class="pun">-</span><span class="pln">project</span>
After creating project go to its root ~cd <span class="pln">my</span><span class="pun">-</span><span class="pln">git</span><span class="pun">-</span><span class="pln">project</span> and open with VS code by running ~code . command.
Step 2) Download and Install Git
If you are creating project in other then C drive, you may need to set Environment Variable path to this C:\Program Files\Git\bin
After that reopen the VS Code to take this in effect.
Step 3) Run git init command
Now open the terminal window, by pressing Ctr+`if in VS code to run git init command to initialize git.
This will create a .git folder and .gitignore file keeping track of files and folder which will not be versioned by Git.
Step 4) Execute Git Command to Commit locally
Before committing files to Github repository online, we will execute some commands to create a bunch of files to be committed.
git status displays the files which are new/ changed but not committed yet.
git add . add files and folders need to be committed. The <strong>.</strong> means all new/ changed files.
git commit -m "Initial commit" commits the file with a message.
Step 5) Register GitHub and Create a repository
Next, we are ready to move our committed files to an online repository like GitHub or GitLab.
Here we will discuss GitHub steps to create a new repository:
Sign Up/ Sign In on the GitHub portal
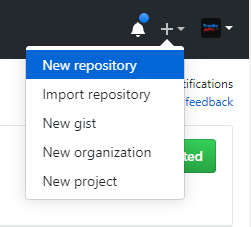
Now hover on the top right + icon, then click the New repository link
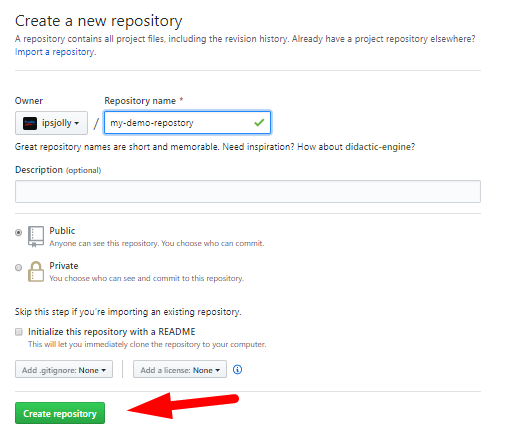
Fill the project repository name and visibility setting private/ public, then click Create repository button
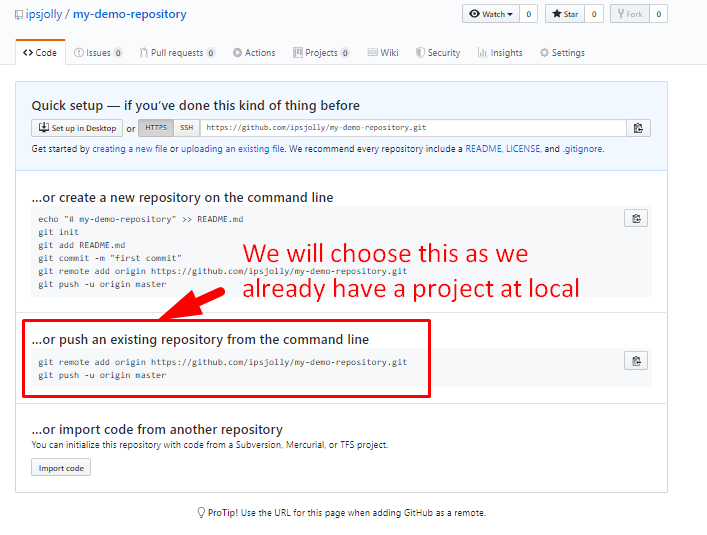
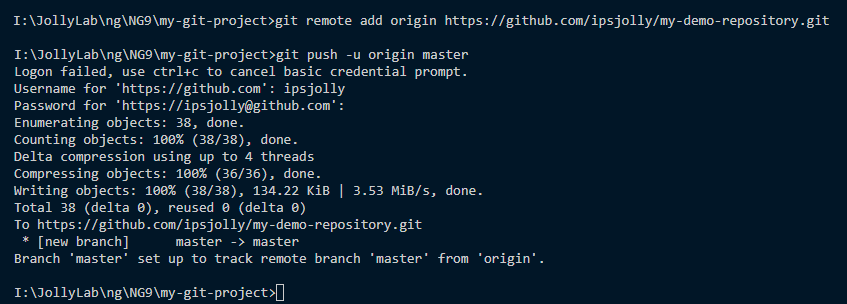
After that, you need to run some commands shown on the next screen
That’s it now you have successfully committed your files on GitHub repository!
Just refresh the repository page on GitHub to see committed files:
Now when you will make modifications to any files or folders, follow the same procedure in step 4 above to commit your changes.
git status
git add .
git commit -m "changes in the index.html"
git push origin


Thank you very mush indeed !!
Great article, thanks!