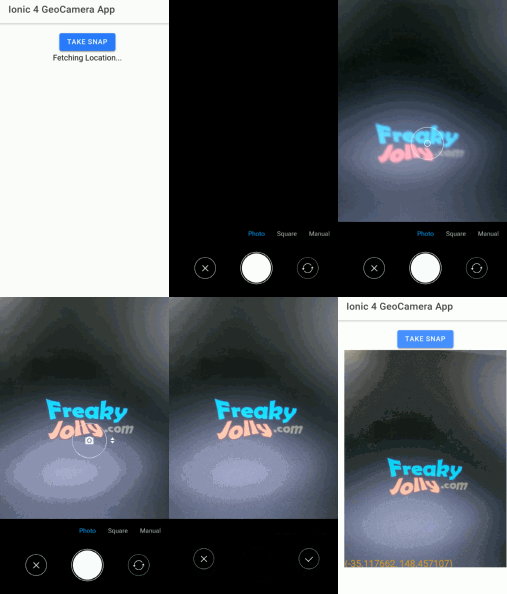
In this article, we are going to learn how to watermark images in Ionic 5/4 applications using the WatermarkJs module. using which we will create a Geolocation camera. The application will take pictures from the device camera then watermark them with current location coordinates with Lattitude and Longitude.
Sometimes users may need this functionality in application to watermark images with any of such information for validation purposes. In this tutorial, we will also discuss a very useful js library WatermarkJS which can be used to marker mark images with text or images.
WatermarkJS quickly does its job with single or multiple images you can check more on the documentation here.
Let’s start with our Geo Camera application.
Create a new Ionic application
Make sure you have the latest Ionic CLI version installed. Create a new Ionic 4 app with a blank template. If you already have an application up and running just skip this step.
$ ionic start Ionic4GeoCamera blank
$ cd Ionic4GeoCamera
Install Required Plugins
For this app, we need Camera, Geolocation and WatermarkJS modules. Just run following NPM commands one by one to install them.
Camera
$ ionic cordova plugin add cordova-plugin-camera
$ npm install @ionic-native/camera
Geolocation
$ ionic cordova plugin add cordova-plugin-geolocation
$ npm install @ionic-native/geolocation
WatermarkJS
$ npm i watermarkjs
Add Camera & Geolocation App Module
Camera and Geolocation modules need to be imported in the app.module.ts file after that we will add them in providers array as shown below:
//app.module.ts
import { NgModule } from '@angular/core';
import { BrowserModule } from '@angular/platform-browser';
import { RouteReuseStrategy } from '@angular/router';

import { IonicModule, IonicRouteStrategy } from '@ionic/angular';
import { SplashScreen } from '@ionic-native/splash-screen/ngx';
import { StatusBar } from '@ionic-native/status-bar/ngx';

import { AppComponent } from './app.component';
import { AppRoutingModule } from './app-routing.module';

import { Camera } from '@ionic-native/camera/ngx';
import { Geolocation } from '@ionic-native/geolocation/ngx';

@NgModule({
  declarations: [AppComponent],
  entryComponents: [],
  imports: [BrowserModule, IonicModule.forRoot(), AppRoutingModule],
  providers: [
    StatusBar,
    SplashScreen,
    Camera,
    Geolocation,
    { provide: RouteReuseStrategy, useClass: IonicRouteStrategy }
  ],
  bootstrap: [AppComponent]
})
export class AppModule { }
Get Location and Watermark Pictures
In the Home template, we will add a button to call the <strong>getPicture()</strong> method to take pictures from the device camera.
  <ion-button (click)="takeSnap()">
    Take Snap
  </ion-button>
Also, add a <img> tag with a template variable to show the coordinate marked image.
<img #waterMarkedImage>Move to home.page.ts file them import Camera, Geolocation and Watermark module, then add in the class constructor
import { Camera, CameraOptions } from '@ionic-native/camera/ngx';
import { Geolocation } from '@ionic-native/geolocation/ngx';
import * as watermark from 'watermarkjs';
constructor(
private camera: Camera,
private geolocation: Geolocation
){
this.getLatLong();
}
The <strong>getLatLong()</strong> method will fetch device coordinates on component load and put details in <strong>locationCordinates</strong>variable
  getLatLong() {
    this.loadingLocation = true;
    this.geolocation.getCurrentPosition().then((resp) => {
      console.log(resp);
      this.locationCordinates = resp.coords;
      this.loadingLocation = false;
    }).catch((error) => {
      this.loadingLocation = false;
      console.log('Error getting location', error);
    });
  }
@ViewChild will access image element to show the updated image.
<strong>cameraOption</strong> will have the configuration of the camera.
  cameraOptions: CameraOptions = {
    quality: 20,
    destinationType: this.camera.DestinationType.DATA_URL,
    encodingType: this.camera.EncodingType.JPEG,
    mediaType: this.camera.MediaType.PICTURE,
    sourceType: this.camera.PictureSourceType.CAMERA
  }
sourceType is a CAMERA, it can also be PHOTOLIBRARY to pick photos from the device gallery.
<strong>takeSnap()</strong> will call the <strong>getPicture()</strong> method of camera service to get click picture and convert it into blob object using fetch() method
  takeSnap() {
    this.camera.getPicture(this.cameraOptions).then((imageData) => {
      this.originalImage = 'data:image/jpeg;base64,' + imageData;

      fetch(this.originalImage)
        .then(res => res.blob())
        .then(blob => {
          this.blobImage = blob;
          this.watermarkImage()
        });
    }, (error) => {
       console.log(error);
    });
  }
<strong>watermarkImage()</strong> will add text on image blob object then set IMG tag with an updated picture.
  watermarkImage() {
    watermark([this.blobImage])
    .image(watermark.text.lowerLeft("("+this.locationCordinates.lattitude+", "+this.locationCordinates.longitude+")", '170px Arial', '#F5A905', 0.8))
      .then(img => {
        this.waterMarkImage.nativeElement.src = img.src;
      });
  }
WatermarkJS plugin can be used to watermark images with image, text with CSS styles and location.
The complete home.page.ts file will look like this:
//home.page.ts
import { Component, ViewChild, ElementRef } from '@angular/core';

import { Camera, CameraOptions } from '@ionic-native/camera/ngx';
import { Geolocation } from '@ionic-native/geolocation/ngx';
import * as watermark from 'watermarkjs';

@Component({
  selector: 'app-home',
  templateUrl: 'home.page.html',
  styleUrls: ['home.page.scss'],
})
export class HomePage {

  @ViewChild('waterMarkedImage') waterMarkImage: ElementRef;

  originalImage = null;
  blobImage = null;
  locationCordinates:any;
  loadingLocation:boolean;

  cameraOptions: CameraOptions = {
    quality: 20,
    destinationType: this.camera.DestinationType.DATA_URL,
    encodingType: this.camera.EncodingType.JPEG,
    mediaType: this.camera.MediaType.PICTURE,
    sourceType: this.camera.PictureSourceType.CAMERA
  }


  constructor(
    private camera: Camera,
    private geolocation: Geolocation
  ) {
    this.getLatLong();
  }

  takeSnap() {
    this.camera.getPicture(this.cameraOptions).then((imageData) => {
      this.originalImage = 'data:image/jpeg;base64,' + imageData;

      fetch(this.originalImage)
        .then(res => res.blob())
        .then(blob => {
          this.blobImage = blob;
          this.watermarkImage()
        });
    }, (error) => {
       console.log(error);
    });
  }

  getLatLong() {
    this.loadingLocation = true;
    this.geolocation.getCurrentPosition().then((resp) => {
      console.log(resp);
      this.locationCordinates = resp.coords;
      this.loadingLocation = false;
    }).catch((error) => {
      this.loadingLocation = false;
      console.log('Error getting location', error);
    });
  }

  watermarkImage() {
    watermark([this.blobImage])
    .image(watermark.text.lowerLeft("(-35.117662, 148.457107)", '200px Arial', '#F5A905', 0.8))
      .then(img => {
        this.waterMarkImage.nativeElement.src = img.src;
      });
  }


}
That’s it now you can check it by running the app on a real device
$ ionic cordova run android
Conclusion
In this port, we discussed how to watermark images in Ionic 5 applications using the WaterMarkJs module. Using this module we watermarked camera images with location coordinates using Geolocation service. I hope you enjoyed this tutorial. Please share it with your friends. Comment your feedback and suggestions.


Leave a Reply