In this tutorial, we will learn How to add data tables in Angular 9/8 application using the Material UI library.
Angular Material is a UI library which provides several useful and Angular compatible UI components. Material’s latest version 9 can be easily installed by running a single NPM command in Angular CLI command line. A Datatable is an advanced form of a table which supports advanced functionalities including Pagination, Sorting, Filter bar and Fixed columns.
Using the Material Datatables, implementation of these functionality becomes very easy. In this demo tutorial, we will create a new Angular 9 application using Angular CLI tool. After that, we will install the Material library in the project to use Datatables and its features.
Let’s get started!
Create a new Angular project
Before, creating a new project make sure you have the latest version of Angular CLI installed. You can update it by executing the following NPM command.
$ ng update @angular/cli @angular/core</pre> To create a new Angular project, run following command and answer for questions to configure the project. <pre class="wp-block-prismatic-blocks"><code class="language-javascript">$ new angular-material-data-table #? Would you like to add Angular routing? No #? Which stylesheet format would you like to use? CSS</pre> Now go to project root by running <pre class="wp-block-prismatic-blocks"><code class="language-javascript">$ cd angular-material-data-table</pre> You can open the project in VS code(if installed) by running: <pre class="wp-block-prismatic-blocks"><code class="language-javascript">$ code .</pre> Install and configure Angular Material library To install the Material library, run following NPM command in the terminal <pre class="wp-block-prismatic-blocks"><code class="language-javascript">$ ng add @angular/material</pre> Select a material theme for the project from the option list <pre class="wp-block-prismatic-blocks"><code class="language-javascript">? Choose a prebuilt theme name, or "custom" for a custom theme: (Use arrow keys) > Indigo/Pink [ Preview: https://material.angular.io?theme=indigo-pink ] Deep Purple/Amber [ Preview: https://material.angular.io?theme=deeppurple-amber ] Pink/Blue Grey [ Preview: https://material.angular.io?theme=pink-bluegrey ] Purple/Green [ Preview: https://material.angular.io?theme=purple-green ] Custom</pre> Answer for Material typography styles in Yes or No. You can read more about it <a href="https://material.io/develop/web/components/typography/" target="_blank" rel="nofollow noopener noreferrer">here</a>. <pre class="wp-block-prismatic-blocks"><code class="language-javascript">? Set up global Angular Material typography styles? No</pre> Select if you want to enable Browser Animation support. If selected Yes, it will automatically import the <code>BrowserAnimationsModulein app.module.ts file in the Angular project.? Set up browser animations for Angular Material? Yes</pre> That's it we are done with Angular project and its configuration of Material support. Now you can run Angular application by executing below command <pre class="wp-block-prismatic-blocks"><code class="language-javascript">$ ng serve --open</pre> <h3>Using Material modules in the Angular project</h3> For implementing Material UI components in an Angular project, we need to import API modules of that particular component in the application's module. In this tutorial we are going to use Datatables, so we will import the <code>MatTableModulein the app.module.ts file as shown below// app.module.ts import { BrowserModule } from '@angular/platform-browser'; import { NgModule } from '@angular/core'; import { AppComponent } from './app.component'; import { BrowserAnimationsModule } from '@angular/platform-browser/animations'; import { MatTableModule } from '@angular/material/table'; @NgModule({ declarations: [ AppComponent ], imports: [ BrowserModule, BrowserAnimationsModule, // Material Modules MatTableModule ], providers: [], bootstrap: [AppComponent] }) export class AppModule { }We will update this file accordingly to use other feature modules later in this tutorial.
Adding Material Datatable
The MatTableModule provides the mat-table directive component, which is used to create a material designed datatable in the template HTML.
For creating the datatable we can either use
mat-tableas an element or directive attributes. It is based on personal preferences as Table based datatable can be easily customized so more preferred. I also prefer the table-based for easy styling and customization.Update the app.component.html file with following HTML.
Table-based datatable using directives as attributes:
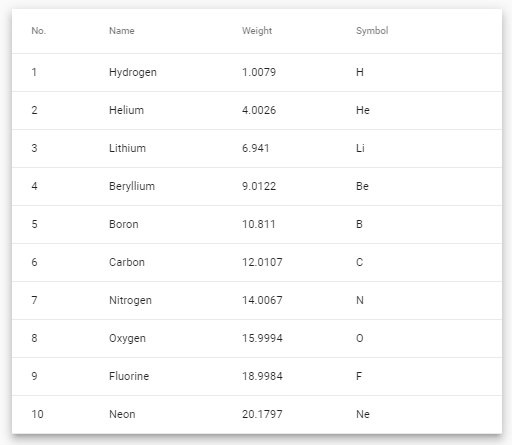
<table mat-table [dataSource]="dataSource" class="mat-elevation-z8"> <!--- Note that these columns can be defined in any order. The actual rendered columns are set as a property on the row definition" --> <!-- Position Column --> <ng-container matColumnDef="position"> <th mat-header-cell *matHeaderCellDef> No. </th> <td mat-cell *matCellDef="let element"> {{element.position}} </td> </ng-container> <!-- Name Column --> <ng-container matColumnDef="name"> <th mat-header-cell *matHeaderCellDef> Name </th> <td mat-cell *matCellDef="let element"> {{element.name}} </td> </ng-container> <!-- Weight Column --> <ng-container matColumnDef="weight"> <th mat-header-cell *matHeaderCellDef> Weight </th> <td mat-cell *matCellDef="let element"> {{element.weight}} </td> </ng-container> <!-- Symbol Column --> <ng-container matColumnDef="symbol"> <th mat-header-cell *matHeaderCellDef> Symbol </th> <td mat-cell *matCellDef="let element"> {{element.symbol}} </td> </ng-container> <tr mat-header-row *matHeaderRowDef="displayedColumns"></tr> <tr mat-row *matRowDef="let row; columns: displayedColumns;"></tr> </table> </pre> Table based data-tables shrinks according to column widths so we need to add the following style in the <strong>app.component.css</strong> to take the full page width <pre><code class="language-scss">table{ width:100vw }</pre> <strong>Element directive-based datatable</strong> <pre class="wp-block-prismatic-blocks"><code class="language-javascript"><mat-table [dataSource]="dataSource" class="mat-elevation-z8"> <!-- Position Column --> <ng-container matColumnDef="position"> <mat-header-cell *matHeaderCellDef> No. </mat-header-cell> <mat-cell *matCellDef="let element"> {{element.position}} </mat-cell> </ng-container> <!-- Name Column --> <ng-container matColumnDef="name"> <mat-header-cell *matHeaderCellDef> Name </mat-header-cell> <mat-cell *matCellDef="let element"> {{element.name}} </mat-cell> </ng-container> <!-- Weight Column --> <ng-container matColumnDef="weight"> <mat-header-cell *matHeaderCellDef> Weight </mat-header-cell> <mat-cell *matCellDef="let element"> {{element.weight}} </mat-cell> </ng-container> <!-- Symbol Column --> <ng-container matColumnDef="symbol"> <mat-header-cell *matHeaderCellDef> Symbol </mat-header-cell> <mat-cell *matCellDef="let element"> {{element.symbol}} </mat-cell> </ng-container> <mat-header-row *matHeaderRowDef="displayedColumns"></mat-header-row> <mat-row *matRowDef="let row; columns: displayedColumns;"></mat-row> </mat-table></pre> From now on, we will only use Table-based template to keep tutorial simple. But you can choose either. Now we will update the <strong>app.component.ts</strong> file with the following code: <pre class="wp-block-prismatic-blocks"><code class="language-javascript">// app.component.ts import { Component } from '@angular/core'; export interface PeriodicElement { name: string; position: number; weight: number; symbol: string; } const ELEMENT_DATA: PeriodicElement[] = [ { position: 1, name: 'Hydrogen', weight: 1.0079, symbol: 'H' }, { position: 2, name: 'Helium', weight: 4.0026, symbol: 'He' }, { position: 3, name: 'Lithium', weight: 6.941, symbol: 'Li' }, { position: 4, name: 'Beryllium', weight: 9.0122, symbol: 'Be' }, { position: 5, name: 'Boron', weight: 10.811, symbol: 'B' }, { position: 6, name: 'Carbon', weight: 12.0107, symbol: 'C' }, { position: 7, name: 'Nitrogen', weight: 14.0067, symbol: 'N' }, { position: 8, name: 'Oxygen', weight: 15.9994, symbol: 'O' }, { position: 9, name: 'Fluorine', weight: 18.9984, symbol: 'F' }, { position: 10, name: 'Neon', weight: 20.1797, symbol: 'Ne' }, ]; @Component({ selector: 'app-root', templateUrl: './app.component.html', styleUrls: ['./app.component.css'] }) export class AppComponent { title = 'angular-material-data-table'; displayedColumns: string[] = ['position', 'name', 'weight', 'symbol']; dataSource = ELEMENT_DATA; } </pre> The <code>displayedColumnsstring array property decides the order and columns which you want to display on frontend. Eachng-containerelement in the template withmatColumnDefproperty is responsible to show columns in datatable. Above setup will create a simple Material Datatable which will look like this:
Pagination in Datatable
To add pagination in Material datatable, we need to importMatTablePaginatorModulein the app.module.ts file as shown below:// app.module.ts import { BrowserModule } from '@angular/platform-browser'; import { NgModule } from '@angular/core'; import { AppComponent } from './app.component'; import { BrowserAnimationsModule } from '@angular/platform-browser/animations'; import { MatTableModule } from '@angular/material/table'; import { MatPaginatorModule } from '@angular/material/paginator'; @NgModule({ declarations: [ AppComponent ], imports: [ BrowserModule, BrowserAnimationsModule, // Material Modules MatTableModule, MatPaginatorModule ], providers: [], bootstrap: [AppComponent] }) export class AppModule { }
After that update the template HTML in app.component.html file with
mat-paginatorelement.<table mat-table [dataSource]="dataSource" class="mat-elevation-z8"> ... ... </table> <mat-paginator [pageSize]="5" [pageSizeOptions]="[5, 10, 15]" showFirstLastButtons></mat-paginator>Place the
mat-paginatorafter the endtabletag.
Now in the app.component.ts file, import the
MatPaginatorandMatTableDataSourceAlso, we need the
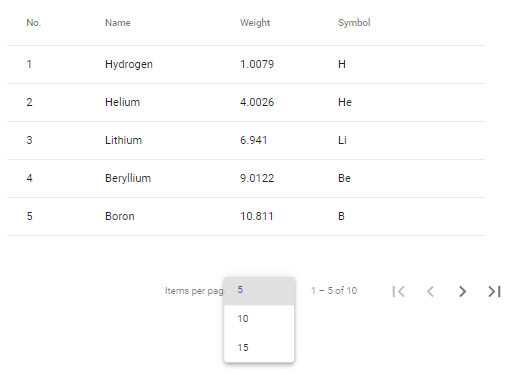
@ViewChilddecorator withstaticset totrueto bind mat-table directive.// app.component.ts import { Component, ViewChild } from '@angular/core'; import { MatPaginator } from '@angular/material/paginator'; import { MatTableDataSource } from '@angular/material/table'; export interface PeriodicElement { name: string; position: number; weight: number; symbol: string; } const ELEMENT_DATA: PeriodicElement[] = [ { position: 1, name: 'Hydrogen', weight: 1.0079, symbol: 'H' }, { position: 2, name: 'Helium', weight: 4.0026, symbol: 'He' }, { position: 3, name: 'Lithium', weight: 6.941, symbol: 'Li' }, { position: 4, name: 'Beryllium', weight: 9.0122, symbol: 'Be' }, { position: 5, name: 'Boron', weight: 10.811, symbol: 'B' }, { position: 6, name: 'Carbon', weight: 12.0107, symbol: 'C' }, { position: 7, name: 'Nitrogen', weight: 14.0067, symbol: 'N' }, { position: 8, name: 'Oxygen', weight: 15.9994, symbol: 'O' }, { position: 9, name: 'Fluorine', weight: 18.9984, symbol: 'F' }, { position: 10, name: 'Neon', weight: 20.1797, symbol: 'Ne' }, ]; @Component({ selector: 'app-root', templateUrl: './app.component.html', styleUrls: ['./app.component.css'] }) export class AppComponent { title = 'angular-material-data-table'; displayedColumns: string[] = ['position', 'name', 'weight', 'symbol']; dataSource = new MatTableDataSource<PeriodicElement>(ELEMENT_DATA); @ViewChild(MatPaginator, { static: true }) paginator: MatPaginator; ngOnInit() { this.dataSource.paginator = this.paginator; } }Pagination will look like this
Sorting in Datatable
To enable column Sorting in Material datatable, we need to import
MatSortModulein the app.module.ts file as shown below// app.module.ts import { BrowserModule } from '@angular/platform-browser'; import { NgModule } from '@angular/core'; import { AppComponent } from './app.component'; import { BrowserAnimationsModule } from '@angular/platform-browser/animations'; import { MatTableModule } from '@angular/material/table'; import { MatPaginatorModule } from '@angular/material/paginator'; import { MatSortModule } from '@angular/material/sort'; @NgModule({ declarations: [ AppComponent ], imports: [ BrowserModule, BrowserAnimationsModule, // Material Modules MatTableModule, MatPaginatorModule, MatSortModule ], providers: [], bootstrap: [AppComponent] }) export class AppModule { }
In the app.component.ts file, import
MatSortmodule and update the file as shown below// app.component.ts import { Component, ViewChild } from '@angular/core'; import { MatPaginator } from '@angular/material/paginator'; import { MatTableDataSource } from '@angular/material/table'; import { MatSort } from '@angular/material/sort'; export interface PeriodicElement { name: string; position: number; weight: number; symbol: string; } const ELEMENT_DATA: PeriodicElement[] = [ { position: 1, name: 'Hydrogen', weight: 1.0079, symbol: 'H' }, { position: 2, name: 'Helium', weight: 4.0026, symbol: 'He' }, { position: 3, name: 'Lithium', weight: 6.941, symbol: 'Li' }, { position: 4, name: 'Beryllium', weight: 9.0122, symbol: 'Be' }, { position: 5, name: 'Boron', weight: 10.811, symbol: 'B' }, { position: 6, name: 'Carbon', weight: 12.0107, symbol: 'C' }, { position: 7, name: 'Nitrogen', weight: 14.0067, symbol: 'N' }, { position: 8, name: 'Oxygen', weight: 15.9994, symbol: 'O' }, { position: 9, name: 'Fluorine', weight: 18.9984, symbol: 'F' }, { position: 10, name: 'Neon', weight: 20.1797, symbol: 'Ne' }, ]; @Component({ selector: 'app-root', templateUrl: './app.component.html', styleUrls: ['./app.component.css'] }) export class AppComponent { title = 'angular-material-data-table'; displayedColumns: string[] = ['position', 'name', 'weight', 'symbol']; dataSource = new MatTableDataSource<PeriodicElement>(ELEMENT_DATA); @ViewChild(MatPaginator, { static: true }) paginator: MatPaginator; @ViewChild(MatSort, { static: true }) sort: MatSort; ngOnInit() { this.dataSource.paginator = this.paginator; this.dataSource.sort = this.sort; } }To show sorting arrows in header columns, we need to update the template HTML.
Step 1) First, add matSort attribute directive on <table> tag
<table mat-table matSort [dataSource]="dataSource" class="mat-elevation-z8"> ... </table></pre> <strong>Step 2) </strong> We can selectively choose the column by adding the mat-sort-header attribute directive on the <code><th>tag<div> <table mat-table matSort [dataSource]="dataSource" class="mat-elevation-z8"> <!--- Note that these columns can be defined in any order. The actual rendered columns are set as a property on the row definition" --> <!-- Position Column --> <ng-container matColumnDef="position"> <th mat-header-cell *matHeaderCellDef mat-sort-header> No. </th> <td mat-cell *matCellDef="let element"> {{element.position}} </td> </ng-container> <!-- Name Column --> <ng-container matColumnDef="name"> <th mat-header-cell *matHeaderCellDef mat-sort-header> Name </th> <td mat-cell *matCellDef="let element"> {{element.name}} </td> </ng-container> <!-- Weight Column --> <ng-container matColumnDef="weight"> <th mat-header-cell *matHeaderCellDef mat-sort-header> Weight </th> <td mat-cell *matCellDef="let element"> {{element.weight}} </td> </ng-container> <!-- Symbol Column --> <ng-container matColumnDef="symbol"> <th mat-header-cell *matHeaderCellDef mat-sort-header> Symbol </th> <td mat-cell *matCellDef="let element"> {{element.symbol}} </td> </ng-container> <tr mat-header-row *matHeaderRowDef="displayedColumns"></tr> <tr mat-row *matRowDef="let row; columns: displayedColumns;"></tr> </table> <mat-paginator [pageSize]="5" [pageSizeOptions]="[5, 10, 15]" showFirstLastButtons></mat-paginator> </div>
Search Filter on Datatable
To implement a Filter search in datatable, we will add input control to search. So import the
MatInputModulein the app.module.ts file... import { MatInputModule } from '@angular/material/input'; @NgModule({ declarations: [ AppComponent ], imports: [ BrowserModule, BrowserAnimationsModule, // Material Modules MatTableModule, MatPaginatorModule, MatSortModule, MatInputModule ], providers: [], bootstrap: [AppComponent] }) export class AppModule { }Now update the app.component.ts file with
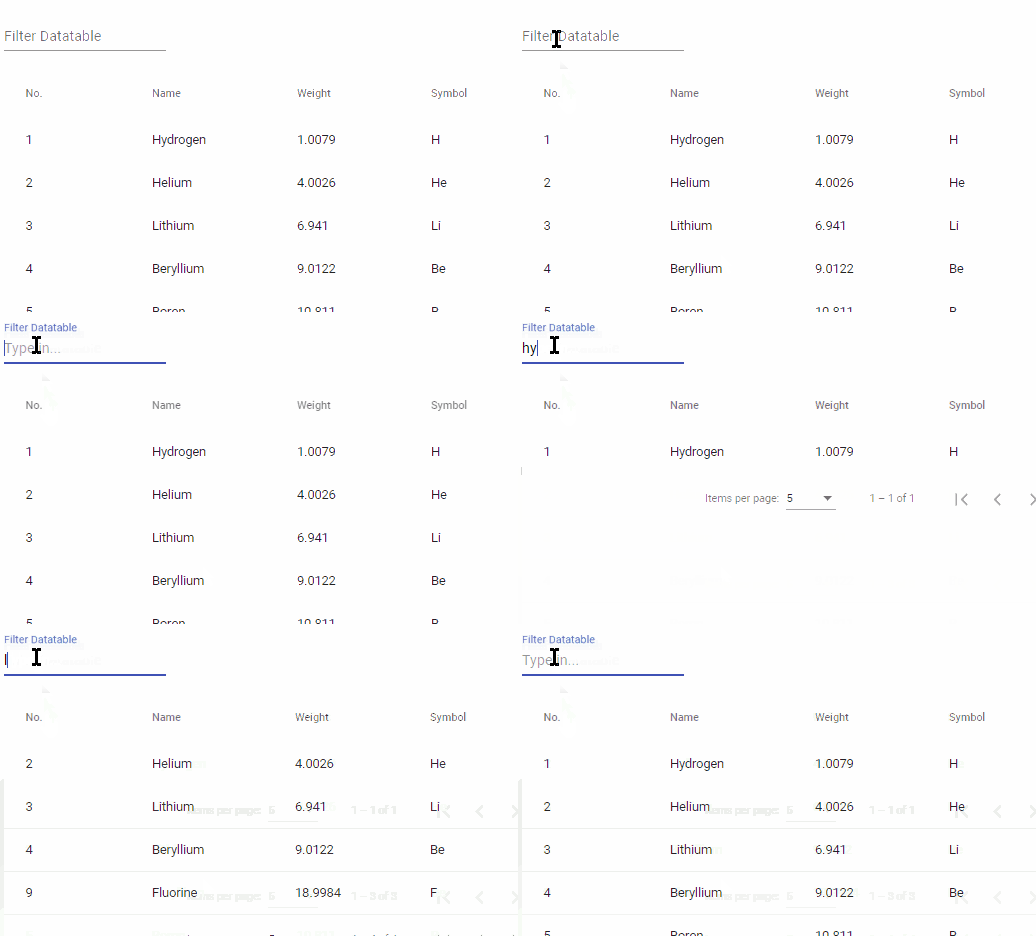
applyFilter()method... export class AppComponent { title = 'angular-material-data-table'; displayedColumns: string[] = ['position', 'name', 'weight', 'symbol']; dataSource = new MatTableDataSource<PeriodicElement>(ELEMENT_DATA); @ViewChild(MatPaginator, { static: true }) paginator: MatPaginator; @ViewChild(MatSort, { static: true }) sort: MatSort; ngOnInit() { this.dataSource.paginator = this.paginator; this.dataSource.sort = this.sort; } applyFilter(filterValue: string) { this.dataSource.filter = filterValue.trim().toLowerCase(); } }In the app.component.html file add the input control below the opening
<table>tag
Conclusion: In this tutorial, we got to learn how to add data tables in Angular application using the Material UI library. We also discussed how to implement Pagination, Sorting and Filter search on data tables.
Category: Angular


