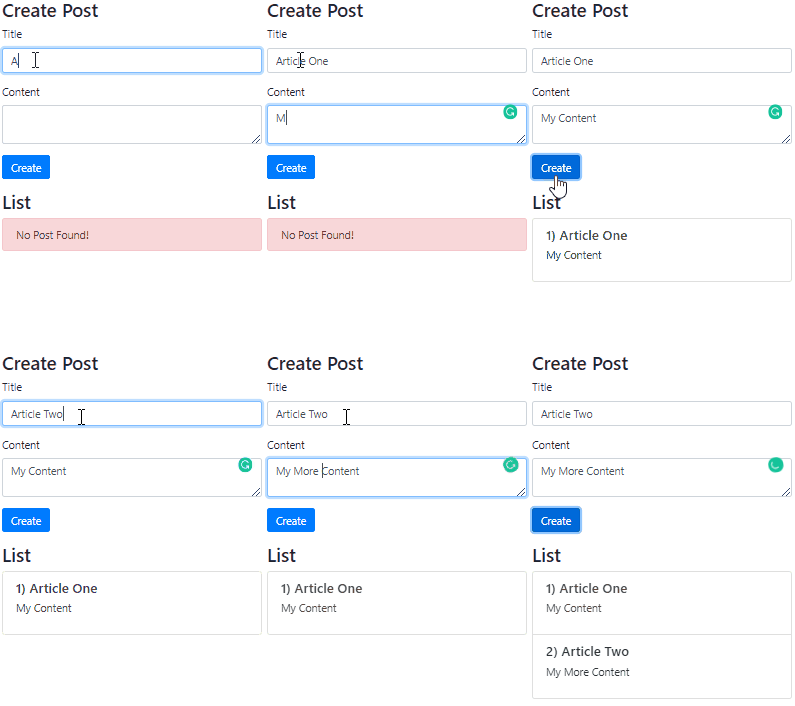
In a real-world Angular application, a number of components may exist with their own specific task to accomplish. This hierarchy of components may have parent-child or relation as siblings.
To communicate from parent to child component we use @Input decorator to pass data from parent to child component and to send back data from child to parent we use @Output decorator. The @Output emits the data using the EventEmitter method to the parent component.
Let’s create a demo on How we can use @Input, @Output and EventEmitter to data communication.
Here we will add two components Create Post and List Posts which will be in App Component.
Create Components
Run following NG generate commands in the terminal window to quickly create components in the posts folder:
$ ng generate component posts/post-create
$ ng generate component posts/post-list
PostCreateComponent
The app-post-create is having (postCreated) Output property to fetch created post data using the emit() method.
// post-create.component.ts
import { Component, Output, EventEmitter } from '@angular/core';

export interface Post {
  title:string;
  content:string;
}

@Component({
  selector: 'app-post-create',
  templateUrl: './post-create.component.html',
  styleUrls: ['./post-create.component.css']
})
export class PostCreateComponent {

  post:Post;

  @Output() postCreated = new EventEmitter<Post>();

  constructor() {
    this.post = {} as Post;
  }

  onAddPost(){
    const post = {
      title: this.post.title,
      content: this.post.content
    }
    this.postCreated.emit(post);
  }

}
<!-- post-create.component.html -->
<h3>Create Post</h3>
<form>
<div class="form-group">
<label>Title</label>
<input type="text" class="form-control" name="title" required [(ngModel)]="post.title">
</div>
<div class="form-group">
<label>Content</label>
<textarea name="content" class="form-control" cols="10" rows="2" required [(ngModel)]="post.content"></textarea>
</div>
<button type="submit" class="btn btn-primary" (click)="onAddPost()">Create</button>
</form>AppComponent
In the AppComponent we will just get newly created post emitted from PostCreateComponent then push it into a storedPosts object.
Then the storedPosts is passed to PostListComponent via [posts] input property.
<!-- app.component.html -->

<app-post-create (postCreated)="onPostAdded($event)"></app-post-create>

<div class="dropdown-divider"></div>

<app-post-list [posts]="storedPosts"></app-post-list>
// app.component.ts
import { Component } from '@angular/core';
@Component({
selector: 'app-root',
templateUrl: './app.component.html',
styleUrls: ['./app.component.css']
})
export class AppComponent {
storedPosts = []
onPostAdded(event) {
this.storedPosts.push(event);
}
}
PostListComponent
The app-post-list component directive is having [posts] input property to take in the emitted via AppComponent.
// post-list.component
import { Component, Input } from '@angular/core';

@Component({
  selector: 'app-post-list',
  templateUrl: './post-list.component.html',
  styleUrls: ['./post-list.component.css']
})
export class PostListComponent {

  @Input() posts = [];

  constructor() { }
}
<!-- post-list.component.html -->
<h3>List</h3>
<ng-container *ngIf="posts.length; else elseTemplate">
<ul class="list-group">
<li class="list-group-item" *ngFor="let post of posts; let i = index">
<h5>{{i+1}}) {{post.title}}</h5>
<p>
{{post.content}}
</p>
</li>
</ul>
</ng-container>
<ng-template #elseTemplate>
<div class="alert alert-danger" role="alert">
No Post Found!
</div>
</ng-template>

