UPDATE: See Complete Application Example Here
Here we will delete SQLite database rows, which we inserted in previous post . For SQLite integration see this post if you are at the beginning of using the database in your application.
So as we already have application using which we can insert rows in the database.
Previous Posts:
Part 1: Android SQLite: Integration.
Part 2: How to Insert New Row in SQLite Database.
Following Post will also answer:
- How to Create a ListView in Android Activity with multiple values?
- How to Remove a row from ListView in Android.
- How to Refresh ListView after a row is removed?
Let’s start creating a view to deleting rows from the table.
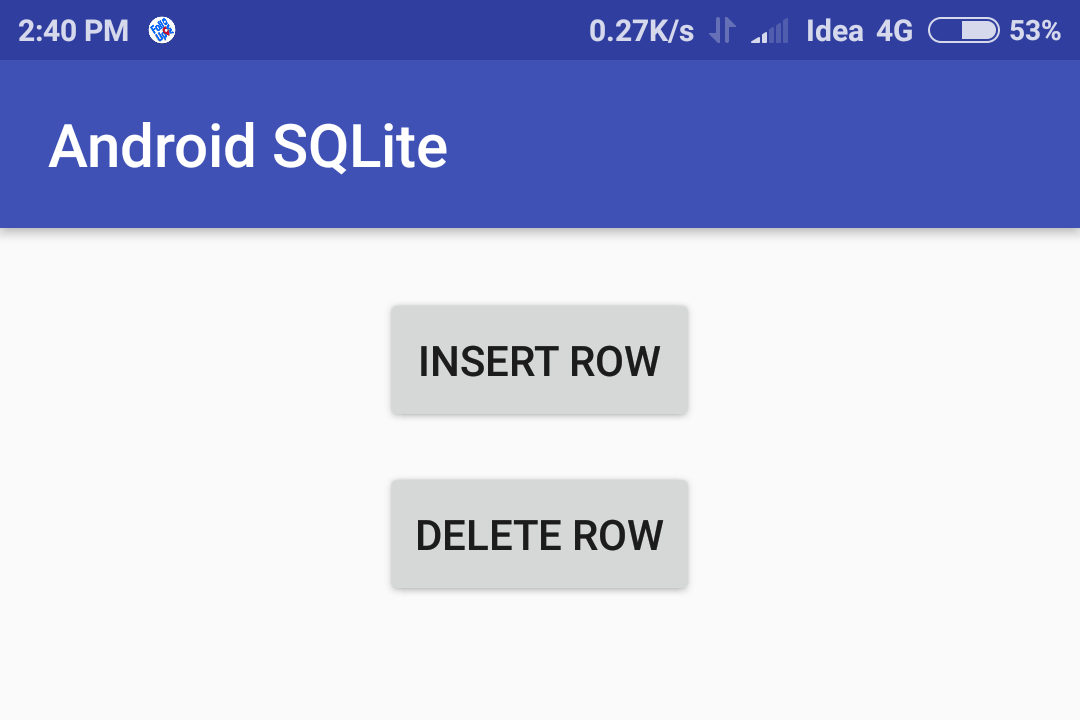
Step 1) In MainActivity.java we will add a new button open a new activity (deleteRowActivity) with ListView having a list of rows in the table with the button to delete a single row.
<?xml version="1.0" encoding="utf-8"?>
<android.support.constraint.ConstraintLayout xmlns:android="http://schemas.android.com/apk/res/android"
    xmlns:app="http://schemas.android.com/apk/res-auto"
    xmlns:tools="http://schemas.android.com/tools"
    android:layout_width="wrap_content"
    android:layout_height="wrap_content"
    android:layout_gravity="center_horizontal"
    android:layout_marginTop="20dp"
    tools:context=".MainActivity">


    <TableLayout
        android:layout_width="wrap_content"
        android:layout_height="wrap_content"
        android:gravity="center_vertical|center_horizontal">


        <TableRow
            android:layout_width="match_parent"
            android:layout_height="match_parent">

            <Button
                android:id="@+id/insertRow"
                android:layout_width="wrap_content"
                android:layout_height="wrap_content"
                android:layout_marginBottom="10dp"
                android:onClick="insertRowActivity"
                android:text="Insert Row" />
        </TableRow>

        <TableRow
            android:layout_width="match_parent"
            android:layout_height="match_parent">

            <Button
                android:id="@+id/deleteRow"
                android:layout_width="wrap_content"
                android:layout_height="wrap_content"
                android:layout_marginBottom="10dp"
                android:onClick="deleteRowActivity"
                android:text="Delete Row" />
        </TableRow>

    </TableLayout>

</android.support.constraint.ConstraintLayout>
Add method deleteRowActivity in MainActivity
public class MainActivity extends AppCompatActivity {

    UsersDatabaseAdapter usersDatabaseAdapter;

    @Override
    protected void onCreate(Bundle savedInstanceState) {
        super.onCreate(savedInstanceState);
        setContentView(R.layout.activity_main);

        // create the instance of Databse
        usersDatabaseAdapter=new UsersDatabaseAdapter(getApplicationContext());
    }

    public void insertRowActivity(View view) {
        Intent myIntent = new Intent(MainActivity.this, InsertRowActivity.class);
        MainActivity.this.startActivity(myIntent);
    }

    public void deleteRowActivity(View view) {
        Intent myIntent = new Intent(MainActivity.this, deleteRowsActivity.class);
        MainActivity.this.startActivity(myIntent);
    }

}
This method will open deleteRowActivity.
Step 2) Create new activity deleteRowActivity, right click on root package > New >Activity > Empty Activity
Add below code in deleteRowActivity we created
public class deleteRowsActivity extends AppCompatActivity {
    ListView listView ;
    ArrayList<UserModel> users=new ArrayList<>();
    static CustomListAdapterDeleteRows deleteAdapter;
    @Override
    protected void onCreate(Bundle savedInstanceState) {
        super.onCreate(savedInstanceState);
        setContentView(R.layout.activity_delete_rows);
        try {
            users = UsersDatabaseAdapter.getRows();
        } catch (JSONException e) {
            e.printStackTrace();
        }
        deleteAdapter = new CustomListAdapterDeleteRows(this, users);
        listView = (ListView) findViewById(R.id.listviewdeleteID);
        listView.setAdapter(deleteAdapter);

        ActionBar actionBar = getSupportActionBar();
        if (actionBar != null) {
            actionBar.setDisplayHomeAsUpEnabled(true);
            actionBar.setTitle("Delete Row from SQLite");
        }
    }


    public boolean onOptionsItemSelected(MenuItem item){
        switch (item.getItemId()) {
            case android.R.id.home:
                finish();
                return true;
        }
        return super.onOptionsItemSelected(item);
    }

    public boolean onCreateOptionsMenu(Menu menu) {
        return true;
    }

}
This activity is only having code to back arrow in Status Bar. Now we will create a ListLayout to show the list of items in this activity.
Add the following layout in activity_delete_rows.xml in res folder
<?xml version="1.0" encoding="utf-8"?>
<android.support.constraint.ConstraintLayout xmlns:android="http://schemas.android.com/apk/res/android"
    xmlns:app="http://schemas.android.com/apk/res-auto"
    xmlns:tools="http://schemas.android.com/tools"
    android:layout_width="match_parent"
    android:layout_height="match_parent"
    tools:context=".deleteRowsActivity">

    <ListView
        android:id="@+id/listviewdeleteID"
        android:layout_width="368dp"
        android:layout_height="495dp"
        android:layout_margin="10dp"
        android:padding="10dp"
        tools:layout_editor_absoluteX="8dp"
        tools:layout_editor_absoluteY="8dp" />

</android.support.constraint.ConstraintLayout>
Step 3) Create ListView, Right click on res folder > New > Layout resource file
Add below code in listviewdelete_row.xml
<?xml version="1.0" encoding="utf-8"?>
<LinearLayout xmlns:android="http://schemas.android.com/apk/res/android"
    xmlns:tools="http://schemas.android.com/tools"
    android:layout_width="match_parent"
    android:layout_height="wrap_content"
    android:orientation="horizontal">

    <TextView
        android:id="@+id/textView1"
        android:layout_width="95dp"
        android:layout_height="match_parent"
        android:layout_marginBottom="10dp"
        android:layout_marginTop="10dp"
        android:layout_weight="1"
        android:text="TextView" />

    <TextView
        android:id="@+id/textView2"
        android:layout_width="83dp"
        android:layout_height="match_parent"
        android:layout_marginBottom="10dp"
        android:layout_marginTop="10dp"
        android:layout_weight="1"
        android:text="TextView" />

    <TextView
        android:id="@+id/textView3"
        android:layout_width="82dp"
        android:layout_height="match_parent"
        android:layout_marginBottom="10dp"
        android:layout_marginTop="10dp"
        android:layout_weight="1"
        android:text="TextView" />

    <Button
        android:id="@+id/button1"
        android:layout_width="40dp"
        android:layout_height="match_parent"
        android:layout_weight="1"
        android:text="Del"
        android:onClick="deleteListRow"/>

</LinearLayout>
This layout will act as a template for listview we will show in activity.
Step 4) Create a custom list adapter (CustomListAdapterDeleteRows) which will extend BaseAdapter
public class CustomListAdapterDeleteRows extends BaseAdapter {

    Context c;
    ArrayList<UserModel> users;

    public CustomListAdapterDeleteRows(Context c, ArrayList<UserModel> users) {
        this.c = c;
        this.users = users;
    }

    @Override
    public int getCount() {
        return users.size();
    }

    @Override
    public Object getItem(int i) {
        return users.get(i);
    }

    @Override
    public long getItemId(int i) {
        return i;
    }

    @Override
    public View getView(final int i, View view, ViewGroup viewGroup) {
        if(view==null)
        {
            view=LayoutInflater.from(c).inflate(R.layout.listviewdelete_row,viewGroup,false);
        }

        TextView mtextView1 = (TextView) view.findViewById(R.id.textView1);
        TextView mtextView2 = (TextView) view.findViewById(R.id.textView2);
        TextView mtextView3 = (TextView) view.findViewById(R.id.textView3);
        Button deleteBtn = (Button) view.findViewById(R.id.button1);

        final UserModel user= (UserModel) this.getItem(i);
        mtextView1.setText(user.getUsername());
        mtextView2.setText(user.getUserphone());
        mtextView3.setText(user.getUseremail());

        deleteBtn.setOnClickListener(new View.OnClickListener() {
            public void onClick(View v) {
                UsersDatabaseAdapter.deleteEntry(user.getID());
                users.remove(i);
                notifyDataSetChanged();
            }
        });

        return view;
    }
}
Constructor function CustomListAdapterDeleteRows will take User data input which we will send from deleteRowActivity.
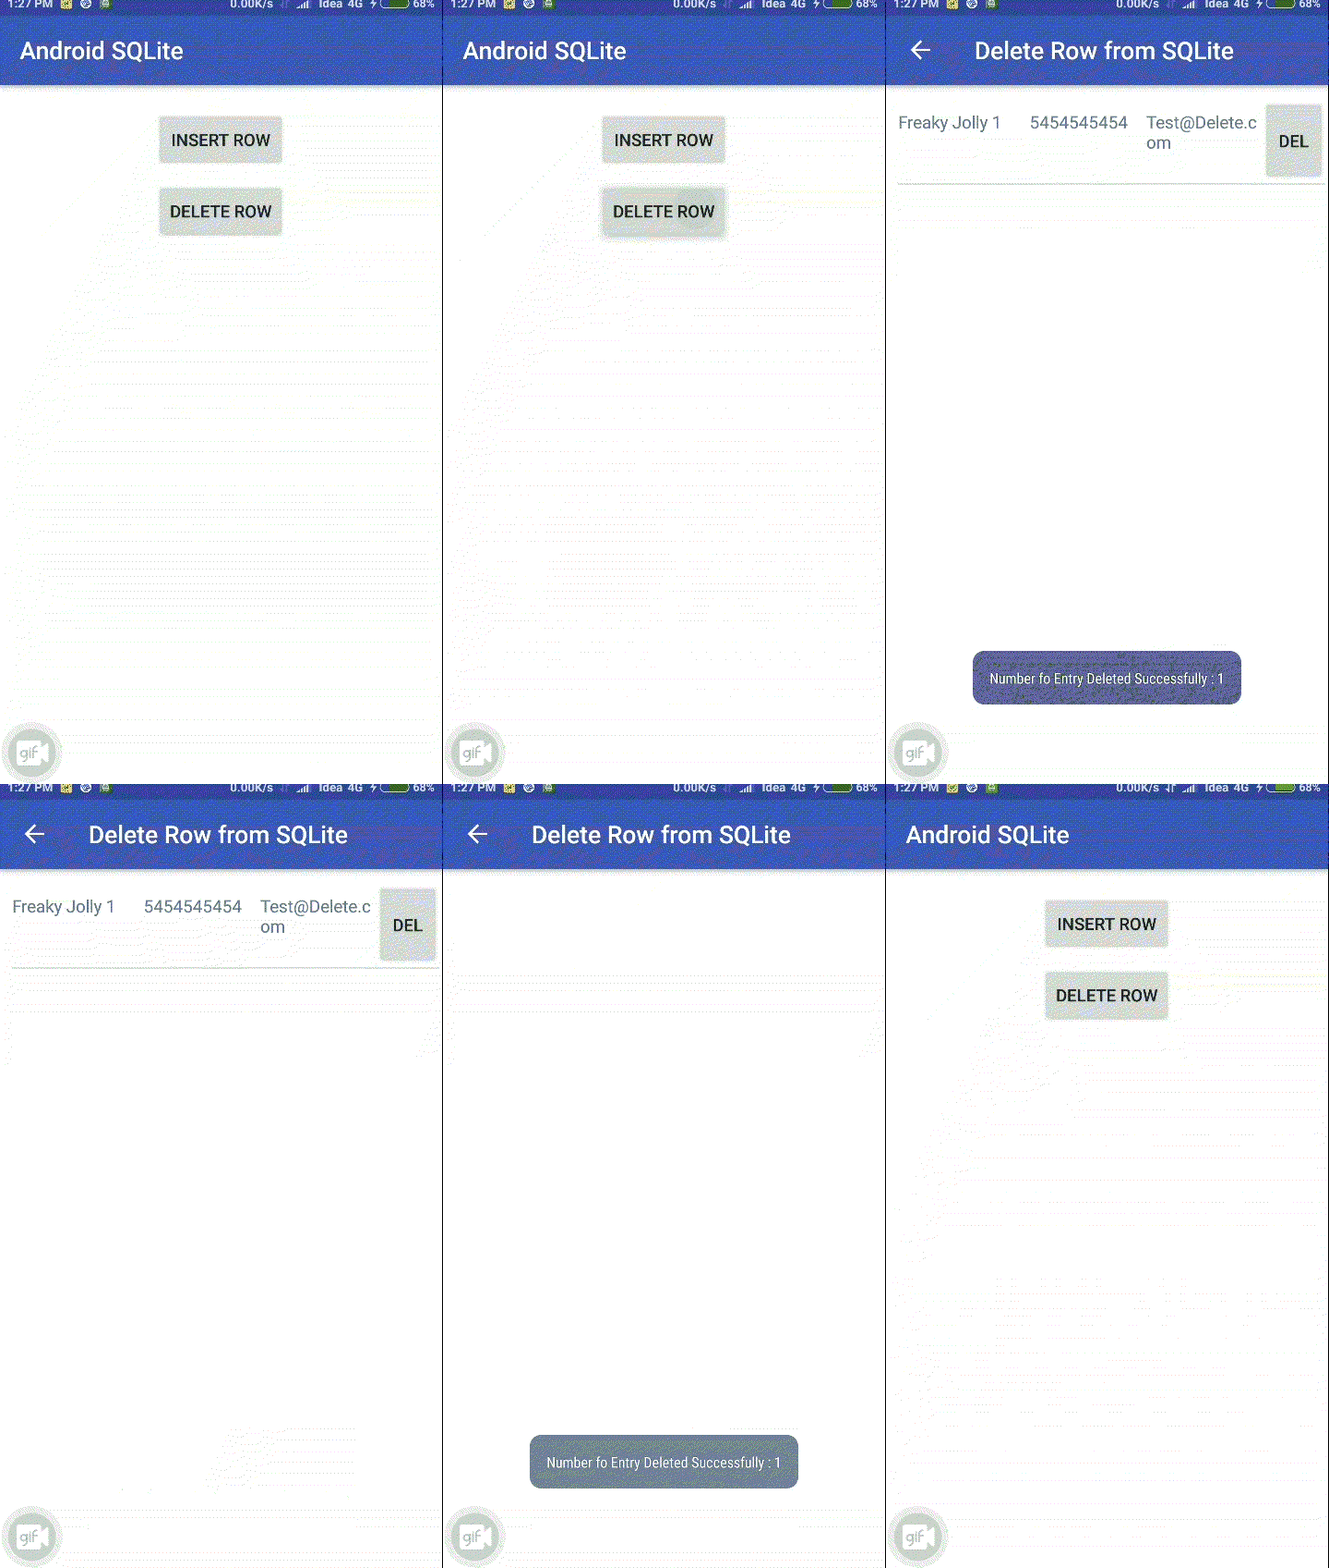
Here we are adding a click listener on DEL button to delete row using deleteEntry method then updating ListView after removing the item at the current position.
Step 5) We will now create a User Modal Class which will have getters and setters for user data.
public class UserModel {

    String ID,username,phone,email;

    public String getID() {
        return ID;
    }

    public void setID(String ID) {
        this.ID = ID;
    }
    public String getUsername() {
        return username;
    }

    public void setUsername(String username) {
        this.username = username;
    }
    public String getUserphone() {
        return phone;
    }

    public void setUserphone(String phone) {
        this.phone = phone;
    }
    public String getUseremail() {
        return email;
    }

    public void setUseremail(String email) {
        this.email = email;
    }

}
Step 6) Add getRows method UsersDatabaseAdapter (See previous post)
public class UsersDatabaseAdapter {
    static ArrayList<UserModel> users=new ArrayList<>();
    static final String DATABASE_NAME = "UsersDatabase.db";
    static final String TABLE_NAME = "USERS";
    static final int DATABASE_VERSION = 1;
    // SQL Statement to create a new database.
    static final String DATABASE_CREATE = "create table "+TABLE_NAME+"( ID integer primary key autoincrement,user_name  text,user_phone  text,user_email text); ";
    private static final String TAG = "UsersDatabaseAdapter:";

    // Variable to hold the database instance
    public static SQLiteDatabase db;
    // Context of the application using the database.
    private final Context context;
    // Database open/upgrade helper
    private static DataBaseHelper dbHelper;
    public  UsersDatabaseAdapter(Context _context)
    {
        context = _context;
        dbHelper = new DataBaseHelper(context, DATABASE_NAME, null, DATABASE_VERSION);
    }

    // Method to open the Database
    public  UsersDatabaseAdapter open() throws SQLException
    {
        db = dbHelper.getWritableDatabase();
        return this;
    }

    // Method to close the Database
    public void close()
    {
        db.close();
    }

    // method returns an Instance of the Database
    public  SQLiteDatabase getDatabaseInstance()
    {
        return db;
    }

    // method to insert a record in Table
    public static String insertEntry(String user_name, String user_phone, String user_email)
    {

        try {


            ContentValues newValues = new ContentValues();
            // Assign values for each column.
            newValues.put("user_name", user_name);
            newValues.put("user_phone", user_phone);
            newValues.put("user_email", user_email);

            // Insert the row into your table
            db = dbHelper.getWritableDatabase();
            long result=db.insert(TABLE_NAME, null, newValues);
            toast("User Info Saved! Total Row Count is "+getRowCount());
            db.close();

        }catch(Exception ex) {
        }
        return "ok";
    }


    // method to get the password  of userName
    public static int getRowCount()
    {
        db=dbHelper.getReadableDatabase();
        Cursor cursor=db.query(TABLE_NAME, null, null, null, null, null, null);
        toast("Row Count is "+cursor.getCount());
        db.close();
        return cursor.getCount();
    }

    public static ArrayList<UserModel> getRows() throws JSONException {

        users.clear();
        UserModel user;
        db=dbHelper.getReadableDatabase();
        Cursor projCursor = db.query(TABLE_NAME, null, null,null, null, null, null,null);
        while (projCursor.moveToNext()) {

            user=new UserModel();
            user.setID(projCursor.getString(projCursor.getColumnIndex("ID")));
            user.setUsername(projCursor.getString(projCursor.getColumnIndex("user_name")));
            user.setUserphone(projCursor.getString(projCursor.getColumnIndex("user_phone")));
            user.setUseremail(projCursor.getString(projCursor.getColumnIndex("user_email")));
            users.add(user);
        }
        projCursor.close();
        return users;
    }

    // method to delete a Record of UserName
    public static int deleteEntry(String ID)
    {
        String where="ID=?";
        int numberOFEntriesDeleted= db.delete(TABLE_NAME, where, new String[]{ID}) ;
        toast("Number fo Entry Deleted Successfully : "+numberOFEntriesDeleted);
        return numberOFEntriesDeleted;
    }
}
Find Source Code Up to this exercise here
Now application will have Delete Row button in main activity which will move to other activity with ListView of all rows in Table and a DEL button to delete each row.


