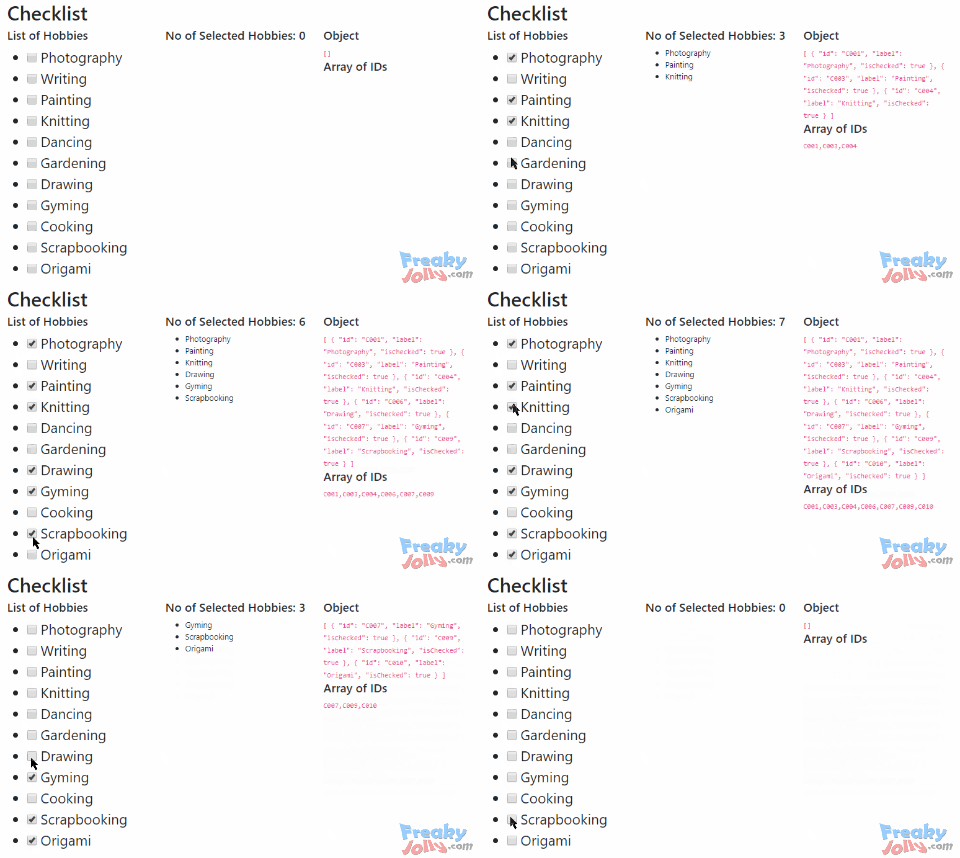
In this tutorial, we will learn how to get multiple checkbox selection values in form of array and object on click of a button or change in checkbox selection.
These methods are generic for Typescript and can be implemented in any Angular 2+ version. We will create a list of dynamic checkboxes with a master checkbox to check/ Uncheck All checkboxes as well.
Let’s get started by implementing the list of checkboxes in the template and updating the component class with an Object to create a checkbox list.
Adding CheckBox Object
To create a list checkbox item, we need to have an object with some properties like id, label and a boolean property isChecked to track if the checkbox is checked or unchecked.
You can have any names for these properties. This object can be a local object places in service or component or fetched from a server using HTTP get/ post calls, to keep tutorial simple we have a static local object of Hobbies shown below:
checkboxesDataList = [to track checkbox state and a
{
id: 'C001',
label: 'Photography',
isChecked: true
},
{
id: 'C002',
label: 'Writing',
isChecked: true
},
{
id: 'C003',
label: 'Painting',
isChecked: true
},
{
id: 'C004',
label: 'Knitting',
isChecked: false
},
{
id: 'C004',
label: 'Dancing',
isChecked: false
},
{
id: 'C005',
label: 'Gardening',
isChecked: true
},
{
id: 'C006',
label: 'Drawing',
isChecked: true
},
{
id: 'C007',
label: 'Gyming',
isChecked: false
},
{
id: 'C008',
label: 'Cooking',
isChecked: true
},
{
id: 'C009',
label: 'Scrapbooking',
isChecked: false
},
{
id: 'C010',
label: 'Origami',
isChecked: false
}
]</pre>
In the HTML template lets add an unordered list with a simple input element:
<pre><code class="language-markup"> <ul class="checkbox-items">
<li *ngFor="let item of checkboxesDataList">
<input type="checkbox" [(ngModel)]="item.isChecked" (change)="changeSelection()">{{item.label}}
</li>
</ul></pre>
On the input element, we need <code>[(ngModel)](change)event handler calling thechangeSelectionmethod.Methods Fetching Checked Items in Object
fetchSelectedItems(): This method willfilterout Checked rows from object by checking the isChecked property of each row.fetchSelectedItems() {: This method will create an array of checked items IDs by looping over the object using the
this.selectedItemsList = this.checkboxesDataList.filter((value, index) => {
return value.isChecked
});
}</pre>
<strong><code>fetchCheckedIDs()
foreachmethod.fetchCheckedIDs() {method will call the above methods to get the required output from object.
this.checkedIDs = []
this.checkboxesDataList.forEach((value, index) => {
if (value.isChecked) {
this.checkedIDs.push(value.id);
}
});
}</pre>
You can choose any way of getting checked items from the checkbox list as per need. The <code>changeSelectionUpdate Template and Class Component
As now we have basic methods and list of checkboxes, update template to show checkbox selection list and selected values and IDs.
<h1>Checklist</h1>to see it in action. In Angular the best way is play with the Object of data get any information like here we used
<div class="row"><div class="col-md-4">
<h4>List of Hobbies</h4><ul class="checkbox-items">
<li *ngFor="let item of checkboxesDataList">
<input type="checkbox" name="" id="" [(ngModel)]="item.isChecked" (change)="changeSelection()">{{item.label}}
</li>
</ul>
</div><div class="col-md-4">
<h4>No of Selected Hobbies: {{selectedItemsList.length}} </h4>
<ul>
<li *ngFor="let item of selectedItemsList">{{item.label}}</li>
</ul>
</div><div class="col-md-4">
<h4>Object</h4>
<code>
{{selectedItemsList | json}}
</code><h4>Array of IDs</h4>
<code>{{checkedIDs}}</code>
</div></div></pre>
The final component class will look like this after arranging the things discussed above:
<pre class="wp-block-prismatic-blocks"><code class="language-javascript">import { Component } from '@angular/core';@Component({
selector: 'app-root',
templateUrl: './app.component.html',
styleUrls: ['./app.component.scss']
})
export class AppComponent {
title = 'angular-checkbox-list-demo';selectedItemsList = [];
checkedIDs = [];checkboxesDataList = [
{
id: 'C001',
label: 'Photography',
isChecked: true
},
{
id: 'C002',
label: 'Writing',
isChecked: true
},
{
id: 'C003',
label: 'Painting',
isChecked: true
},
{
id: 'C004',
label: 'Knitting',
isChecked: false
},
{
id: 'C004',
label: 'Dancing',
isChecked: false
},
{
id: 'C005',
label: 'Gardening',
isChecked: true
},
{
id: 'C006',
label: 'Drawing',
isChecked: true
},
{
id: 'C007',
label: 'Gyming',
isChecked: false
},
{
id: 'C008',
label: 'Cooking',
isChecked: true
},
{
id: 'C009',
label: 'Scrapbooking',
isChecked: false
},
{
id: 'C010',
label: 'Origami',
isChecked: false
}
]ngOnInit(): void {
this.fetchSelectedItems()
this.fetchCheckedIDs()
}changeSelection() {
this.fetchSelectedItems()
}fetchSelectedItems() {
this.selectedItemsList = this.checkboxesDataList.filter((value, index) => {
return value.isChecked
});
}fetchCheckedIDs() {
this.checkedIDs = []
this.checkboxesDataList.forEach((value, index) => {
if (value.isChecked) {
this.checkedIDs.push(value.id);
}
});
}}
</pre>
For making UI look better we have added ~<strong>bootstrap.css</strong> style in the index.html file's head section
<pre class="lang:xhtml mark:3 decode:true "><head>
...
<link rel="stylesheet" href="https://stackpath.bootstrapcdn.com/bootstrap/4.4.1/css/bootstrap.min.css">
</head></pre>
<strong>Conclusion</strong>: Run you application by executing <code>$ ng serve --openisCheckedproperty to fetch checked items.Category: Angular


That’s great.. but please let us to understand how can we put limit the checkboxes to check for example I want to check only 4 check boxes to check and then other should be unchecked. thanks