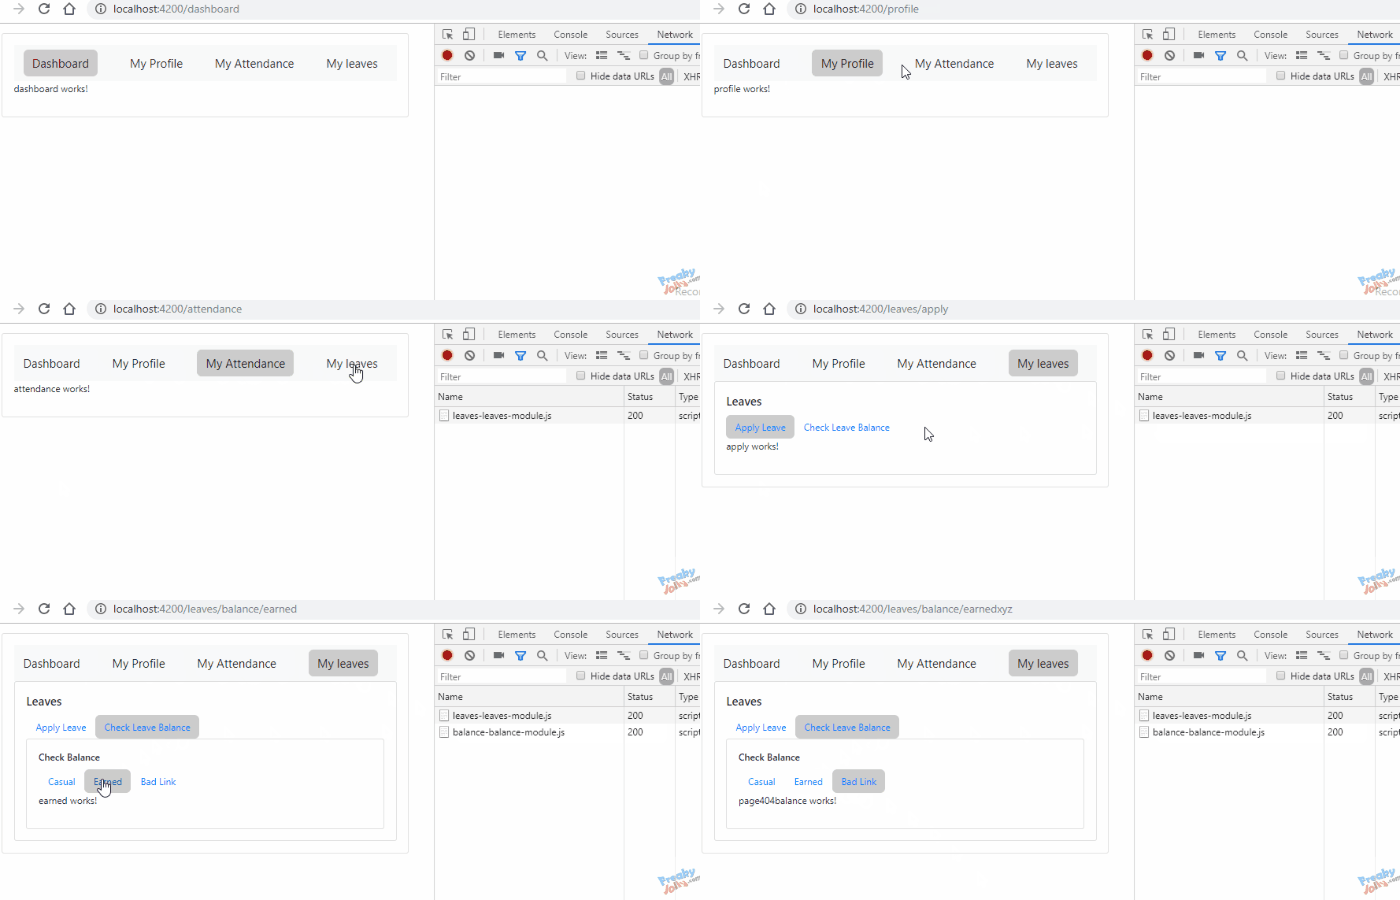
In our previous tutorial, we discussed how to implement a very basic Routing Module in an Angular 10/9/8/7/6/5/4 application. Here we will go a step further to discuss some more concepts related to Routing in Angular 8 application.
What we are going to create?
Create an Angular 8 application which will have Nested Routing up to three levels. Each level of components has its own Router Module. We will also discuss How to use lazy loading concept in Angular 8 Routing to load components on run time when they are called.
1) Three levels of Nested Routing.
We will create a demo HRMS(Human Resource Mangement System) application’s navigation structure. The first level of navigations will have following Tab links
Level 1:
– Dashboard(Default page visible on app load)
– My Profile
– My Attendance
– My leaves –>
Level 2: “My leaves” there are two links:
– Apply Leave
– Check Leave Balance –>
Level 3: “Check Leave Balance” further have two tab links
– Casual
– Earned
– Bad Link
Each above level will have it’s own RouterOutlet directive to show active path’s component content. Read more about RouterOutlet directive in the previous post.
2) Separate RouterModules and Component Modules.
Two child component Leaves and Balance will have their own RoutingModule and Component module making lazy loading of these components possible.
3) Handling of “404 Page not found” at each level.
In all Routing Module files, one parent and nested Routing Module files will have wildcard path matching strategy to handle “404 pages not found” error to protect apps from crashes when any wrong path is entered.
Let’s get started!
Start with new Angular 8 application, create using Angular CLI handy useful commands to generate components and modules from CLI or you can use Stacblitz online IDE to create Angular app.
Here we will go with Angular CLI tool. Make sure you have updated the CLI tool by running following NPM command and you are using Node 10 or later.
$ ng update @angular/cli @angular/coreCreate a new Angular application
Run the following command in CLI to create a new Angular application
# Create new application
$ ng new AngularNestedRouting
? Would you like to add Angular routing? Yes
? Which stylesheet format would you like to use? CSS

# Navigate to app directory
$ cd AngularNestedRouting

# Open in Visual Studio Code
$ code .
Create New Components in CLI
Let’s create some components to create an HRMS demo application. Run following Ng CLI generate commands to create components for first, second then the third level of navigation.
Parent components (Level 1)
$ ng g c attendance --skipTests=true
$ ng g c dashboard --skipTests=true
$ ng g c leaves --skipTests=true
$ ng g c page404 --skipTests=true
$ ng g c profile --skipTests=true
Child components of leaves (Level 2)
$ ng g c leaves/apply --skipTests=true
$ ng g c leaves/balance --skipTests=true
$ ng g c leaves/page404leaves --skipTests=true
Child components of level 2 leaves/balance (Level 3)
$ ng g c leaves/balance/casual --skipTests=true
$ ng g c leaves/balance/earned --skipTests=true
$ ng g c leaves/balance/page404balance --skipTests=true
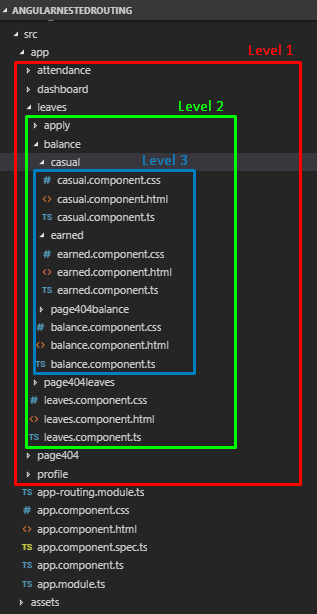
After creating components we have the following file structure:
So, we have components ready with one app-routing.module.ts file which was created by CLI at the root with the main navigation Routing path config.
Adding RouterOutlet directive at each level
RouterOutlet directive <router-outlet></router-outlet> is placed in the parent component template where other components are loaded on Routing from one view to next view navigation. As in our application, we have three level hierarchy of parent-child components, we will add RouterOutlet directive at three places.
By default, its added in the app.component.html file which is the main component of the application.
<ul>
  <li>
    <a [routerLink]="'/'" routerLinkActive="active"> Dashboard </a>
  </li>
  <li>
    <a [routerLink]="'/profile'" routerLinkActive="active"> My Profile </a>
  </li>
  <li>
    <a [routerLink]="'/attendance'" routerLinkActive="active"> My Attendance </a>
  </li>
  <li>
    <a [routerLink]="'/leaves'" routerLinkActive="active"> My leaves </a>
  </li>
</ul>

  <router-outlet></router-outlet>
Here we also have links to other component views which will get loaded into router-outlet
The routerLink directive is used in Angular template for navigation linking.
The routerLinkActive directive adds a specified class(here ‘active’) when that link is open in view. This directive is helpful in highlighting the active link.
Now for level 2, open the app/leaves/leaves.component.html file and replace with following HTML template code having routerOutlet and navigation links.
<h3>Leaves</h3>
<ul>
  <li>
    <a [routerLink]="'apply'" routerLinkActive="active"> Apply Leave </a>
  </li>
  <li>
    <a [routerLink]="'balance'" routerLinkActive="active">
      Check Leave Balance
    </a>
  </li>
</ul>
<router-outlet></router-outlet>
The third routerOutlet will sit in the balance component. Open app/leaves/balance/balance.component.html file then replace following HTML template in it.
<h5>Check Balance</h5>
<ul>
    <li>
      <a [routerLink]="'casual'" routerLinkActive="active">Casual</a>
    </li>
    <li>
      <a [routerLink]="'earned'" routerLinkActive="active">Earned</a>
    </li>
    <li>
      <a [routerLink]="'earnedxyz'" routerLinkActive="active">Bad Link</a>
    </li>
  </ul>
  <router-outlet></router-outlet>
Modularize the application component
The main concept of Angular application is its ability to remain modular and reusable, which makes each component independent and separate from the rest of the application. This makes reusability and maintenance of components very easy.
Here we will make leaves and balance component lazy-loaded by adding their own RouterModules and component module files. These components will have their own RouterModule configuration to load their child components.
What is lazy-loading in Angular?
The concept of lazy-loading is proved very helpful in optimizing large application which scales to complex levels and has a number of components and level hierarchies in them.
Application without lazy-loading loads all components at once on initialization which makes application slow and inefficient in terms of memory usage.
Using lazy-loading components which are required are bundled and loaded runtime on request. The concept of lazy loading works on demand and supply scenario, keeps application light and optimized.
How to make a component in Angular a Lazy-loaded component?
In Angular application converting a simple traditional component into an optimized lazy-loaded component is done by creating its own module. For example for making leaves component a lazy-loaded one, add leaves.module.ts in it. Let’s discuss it in details further.
Create Modules and RouterModules of Child Components
Let’s create modules for Leaves and it’s child Balance component. With Modules create RouterModule as these have subcomponents.
Run following Ng CLI commands to create Module and RouterModules.
$ ng g m leaves --routing
$ ng g m leaves/balance --routing
In the above command, m is for modules. The –routing option flag will create RouterModule as well.
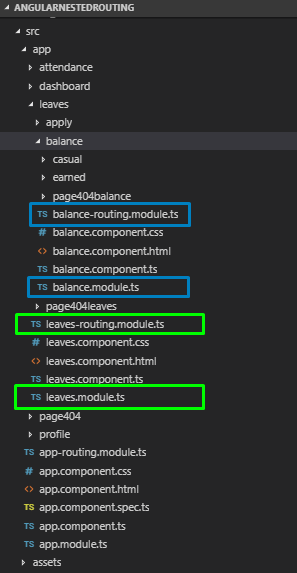
After running above command now we have the following directory structure.
Update Leaves and Balance Module Files
Leaves and Balance have their own module so we will add their child components in these modules instead of App main module.
Remove child components and update app.module.ts file with following code.
//app.module.ts
import { BrowserModule } from '@angular/platform-browser';
import { NgModule } from '@angular/core';

import { AppRoutingModule } from './app-routing.module';
import { AppComponent } from './app.component';
import { AttendanceComponent } from './attendance/attendance.component';
import { DashboardComponent } from './dashboard/dashboard.component';
import { Page404Component } from './page404/page404.component';
import { ProfileComponent } from './profile/profile.component';
// import { ApplyComponent } from './leaves/apply/apply.component';
// import { BalanceComponent } from './leaves/balance/balance.component';
// import { Page404leavesComponent } from './leaves/page404leaves/page404leaves.component';
// import { CasualComponent } from './leaves/balance/casual/casual.component';
// import { EarnedComponent } from './leaves/balance/earned/earned.component';
// import { Page404balanceComponent } from './leaves/balance/page404balance/page404balance.component';

@NgModule({
  declarations: [
    AppComponent,
    AttendanceComponent,
    DashboardComponent,
    Page404Component,
    ProfileComponent,
    // ApplyComponent,
    // BalanceComponent,
    // Page404leavesComponent,
    // CasualComponent,
    // EarnedComponent,
    // Page404balanceComponent
  ],
  imports: [
    BrowserModule,
    AppRoutingModule
  ],
  providers: [],
  bootstrap: [AppComponent]
})
export class AppModule { }
Update app/leaves/leave.module.ts and app/leaves/balance/balance.module.ts files with following code.
//leaves.module.ts
import { NgModule } from '@angular/core';
import { CommonModule } from '@angular/common';

import { LeavesRoutingModule } from './leaves-routing.module';
import { LeavesComponent } from './leaves.component';
import { ApplyComponent } from './apply/apply.component';
import { Page404leavesComponent } from './page404leaves/page404leaves.component';


@NgModule({
  declarations: [
    LeavesComponent,
    ApplyComponent,
    Page404leavesComponent
  ],
  imports: [
    CommonModule,
    LeavesRoutingModule,
  ]
})
export class LeavesModule { }
//balance.module.ts
import { NgModule } from '@angular/core';
import { CommonModule } from '@angular/common';

import { BalanceRoutingModule } from './balance-routing.module';
import { CasualComponent } from './casual/casual.component';
import { EarnedComponent } from './earned/earned.component';
import { BalanceComponent } from './balance.component';
import { Page404balanceComponent } from './page404balance/page404balance.component';


@NgModule({
  declarations: [
    BalanceComponent,
    CasualComponent,
    EarnedComponent,
    Page404balanceComponent
  ],
  imports: [
    CommonModule,
    BalanceRoutingModule
  ]
})
export class BalanceModule { }
Implement Nested Routing with Lazy-Loading
Let’s setup Routing configuration in RouterModule files.
You can check the previous post on how to setup Routing in Angular application here.
In application’s main Routing module app-routing.module.ts file replace the following code:
//app-routing.module.ts
import { NgModule } from '@angular/core';
import { Routes, RouterModule } from '@angular/router';
import { DashboardComponent } from './dashboard/dashboard.component';
import { ProfileComponent } from './profile/profile.component';
import { AttendanceComponent } from './attendance/attendance.component';
import { Page404Component } from './page404/page404.component';

const routes: Routes = [
    { path: 'dashboard', component: DashboardComponent },
    { path: 'profile', component: ProfileComponent },
    { path: 'attendance', component: AttendanceComponent },
    { path: 'leaves', loadChildren: () => import(`./leaves/leaves.module`).then(m => m.LeavesModule) },
    { path: '', redirectTo: 'dashboard', pathMatch: 'full' },
    { path: '**', component: Page404Component },
];
@NgModule({
    imports: [
        RouterModule.forRoot(routes,{ enableTracing: false })
    ],
    exports: [RouterModule]
})
export class AppRoutingModule { }
In above code, Routes are configured with and without lazy-loading. For leaves, we used the loadChildren property to define the path of the module which is to be lazy-loaded.
Here you may have noticed the new way of importing the module using import method to return module which can detect if there is an error on the imported module.
Before Angular 8 we used the following style, which takes the module as a string which lacks real-time error detection.
{ path: 'leaves', loadChildren: './leaves/leaves.module#LeavesModule' }
Other than these use component property which will simply load components on app load.
Basically in one line we can say leaves component handed its responsibility to its module then it will be used to load it and its child component defined in its module file leaves.module.ts
Let’s check RouterModule of leaves component. In leaves-routing.module.ts file replace following content.
//leaves-routing.module.ts
import { NgModule } from '@angular/core';
import { Routes, RouterModule } from '@angular/router';
import { ApplyComponent } from './apply/apply.component';
import { LeavesComponent } from './leaves.component';
import { Page404leavesComponent } from './page404leaves/page404leaves.component';


const routes: Routes = [
  {
    path: '', component: LeavesComponent, children: [
      {
        path: 'apply', component: ApplyComponent
      },
      { path: 'balance', loadChildren: () => import(`./balance/balance.module`).then(m => m.BalanceModule) },
      {
        path: '', redirectTo: 'apply', pathMatch: 'full'
      },
      { path: '**', component: Page404leavesComponent }
    ]
  }
];

@NgModule({
  imports: [RouterModule.forChild(routes)],
  exports: [RouterModule]
})
export class LeavesRoutingModule { }
children property is having routes with path of child components. For balance we used loadChildren for lazy-loading its module.
Similarly replace the balance-routing.module.ts file with the following code:
//balance-routing.module.ts
import { NgModule } from '@angular/core';
import { Routes, RouterModule } from '@angular/router';
import { BalanceComponent } from './balance.component';
import { CasualComponent } from './casual/casual.component';
import { EarnedComponent } from './earned/earned.component';
import { Page404balanceComponent } from './page404balance/page404balance.component';


const routes: Routes = [
  {
    path: '', component: BalanceComponent, children: [

      {
        path: 'casual', component: CasualComponent
      },
      {
        path: 'earned', component: EarnedComponent
      },
      {
        path: '', redirectTo: 'casual', pathMatch: 'full'
      },
      { path: '**', component:  Page404balanceComponent}
    ]
  }
];

@NgModule({
  imports: [RouterModule.forChild(routes)],
  exports: [RouterModule]
})
export class BalanceRoutingModule { }
That’s it we are ready to run the application by running this command
$ ng serve --openCheck StackBlitz demo link
Conclusion: Here we created an Angular 8 application using Nested Routing deep to three levels and lazy loaded child components by defining their own modules and Router Modules. We used RouterOutlet directive in child components to show three level component loading in the same view.


