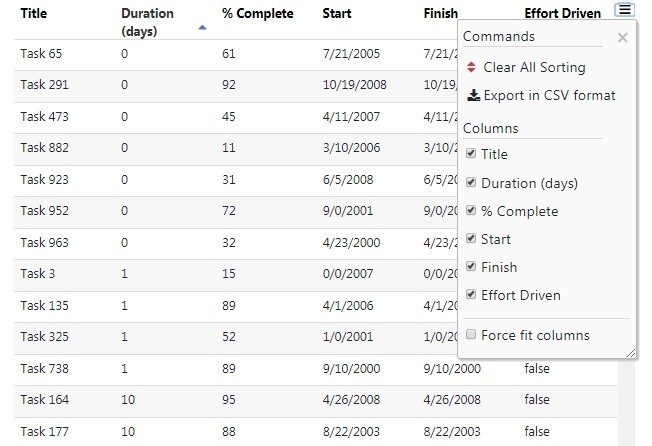
Today we will talk about a Spread Sheet like Datagrid/ Datatable which is fully featured and works like a charm. SlickGrid library is known for its performance, which can display a large number of data( More than 1 million rows ) in single Datatable.
SlickGrid is very popular as a jQuery library and able to show data in any format and form. Datagrids generated can be easily customized through Bootstrap 4. You can also add your own custom style using CSS or SCSS variables.
Here we will go through Installations steps in Angular 7 application and discuss step by step procedure to create a SlickGrid and also dependencies required. Installation of SlickGrid is a bit tricky but believe me, it’s really worth of 🙂
Let’s start with installation steps
Create a new Angular 7 project
To demonstrate SlickGrid installation from scratch, create a new Angular project using Ng CLI with current version @7.3.9. You can continue with your already available projects with Angular 7 version.
# Create a new project
$ ng new ng-slickGrid

# Enter project directory
$ cd ng-slickGrid

# Open in Visual Studio Code IDE
$ code .
Install SlickGrid and Dependencies
After creating a project, install required libraries and other dependencies like ngx-translate.
Run following NPM command to install
$ npm install --save angular-slickgrid jquery bootstrap font-awesomeangular-slickgrid: Angular wrapper for jQuery SlickGrid library.
jQuery: Dependency for a jQuery library.
Bootstrap: For theming the grid using Bootstrap 4.x.x.
Install ngx-translate
ngx-translate is internationalization (i18n) library, which translates the text in the required language on the fly. According to the SlickGrid author, ngx-translate is required and mandatory to use this Datagrid. It is not using already available i18n module in Angular as it doesn't support dynamic language change without page reload, read more about it here.
Run following npm command to install ngx-translator and http-loader(required to load i18n language translation JSON files).
$ npm install @ngx-translate/core @ngx-translate/http-loaderProject Configuration
After installation of required libraries and dependencies, we will add the CSS & JS library path in the angular.json file.
Open angular.json file available in project root then place CSS and JS file path as shown below
...
...
            "styles": [
              "./node_modules/bootstrap/dist/css/bootstrap.css",
              "./node_modules/font-awesome/css/font-awesome.css",
              "./node_modules/flatpickr/dist/flatpickr.css",
              "./node_modules/angular-slickgrid/lib/multiple-select/multiple-select.css",
              "src/styles.css",
              "./node_modules/angular-slickgrid/styles/css/slickgrid-theme-bootstrap.css"
            ],
            "scripts": [
              "./node_modules/jquery/dist/jquery.js",
              "./node_modules/jquery-ui-dist/jquery-ui.min.js",
              "./node_modules/slickgrid/lib/jquery.event.drag-2.3.0.js",
              "./node_modules/bootstrap/dist/js/bootstrap.js",
              "./node_modules/angular-slickgrid/lib/multiple-select/multiple-select.js"
            ],
...
...
Some are optional plugins like flatpicker( Used to show DateTime pickers ) & jquery.event.drag-2.3.0.js, jquery-ui.min.js (Used for Row Drag drop and Sorting)
Use SlickGrid in Component
So we are ready to use SlickGrid in the component. Place following template in the app.component.ts file.
<div class="container">
  <angular-slickgrid gridId="grid1"
            [columnDefinitions]="columnDefinitions"
            [gridOptions]="gridOptions"
            [dataset]="dataset">
  </angular-slickgrid>
</div>
In this template we have slickGrid directive <angular-slickgrid></angular-slickgrid> with required attribute parameters
gridId: Every slickGrid must have an ID defined.
[columnDefinitions]: Takes an object defining columns and options like enable disable sorting or resize etc.
[gridOptions]: Options related to whole grid.
[dataset]: This is the Data object of rows which we are going to make slikGrid rows.
Define the above object in the component. Open app.component.ts file then add the following
import { Component, OnInit } from '@angular/core';
import { Column, GridOption } from 'angular-slickgrid';


@Component({
  selector: 'app-root',
  templateUrl: './app.component.html',
  styleUrls: ['./app.component.css']
})
export class AppComponent implements OnInit {

  title = 'ngSlickGrid';

  columnDefinitions: Column[] = [];
  gridOptions: GridOption = {};
  dataset: any[] = [];

  ngOnInit(): void {
    this.columnDefinitions = [
      { id: 'title', name: 'Title', field: 'title', sortable: true },
      { id: 'duration', name: 'Duration (days)', field: 'duration', sortable: true },
      { id: '%', name: '% Complete', field: 'percentComplete', sortable: true },
      { id: 'start', name: 'Start', field: 'start' },
      { id: 'finish', name: 'Finish', field: 'finish' },
      { id: 'effort-driven', name: 'Effort Driven', field: 'effortDriven', sortable: true }
    ];
    this.gridOptions = {
      enableAutoResize: true,       // true by default
      enableCellNavigation: true
    };

    // fill the dataset with your data
    // VERY IMPORTANT, Angular-Slickgrid uses Slickgrid DataView which REQUIRES a unique "id" and it has to be lowercase "id" and be part of the dataset
    this.dataset = [];

    // for demo purpose, let's mock a 1000 lines of data
    for (let i = 0; i < 1000; i++) {
      const randomYear = 2000 + Math.floor(Math.random() * 10);
      const randomMonth = Math.floor(Math.random() * 11);
      const randomDay = Math.floor((Math.random() * 28));
      const randomPercent = Math.round(Math.random() * 100);

      this.dataset[i] = {
        id: i, // again VERY IMPORTANT to fill the "id" with unique values
        title: 'Task ' + i,
        duration: Math.round(Math.random() * 100) + '',
        percentComplete: randomPercent,
        start: `${randomMonth}/${randomDay}/${randomYear}`,
        finish: `${randomMonth}/${randomDay}/${randomYear}`,
        effortDriven: (i % 5 === 0)
      };
    }
  }
}
Now you can check a fairly simple and feature rich SlickGrid ready to play with.
Here we are adding some dummy data on with 1000 rows.
SlickGrid is customizable at every level and have options available from simple like sorting, filter, formatters to advance level frozen column and frozen rows on Grid
There tons on options available in SlickGride to do nearly anything. You can check working examples here

