Android SQLite provides a mean for an application developer to save data locally in device memory in a structured form, which makes it very easy to read, update or delete information saved in multiple formats.
Android SQLite is the best way to save data locally in the device itself. SQLite acts as a local database for applications saving data in tradition columns rows architecture. It is suited where data is structured and repeating, for example, user data information. Here we will discuss the implementation of SQLite form beginning using API’s of android.database.sqlite package.
Data limits allowed in SQLite is explained here
Here I am going to create an application sample which will explain some basic Database table operations like Insert, Delete, Update, Truncate Table, Get Rows Count and Get All Rows saved in Table.
So let’s Get Started…
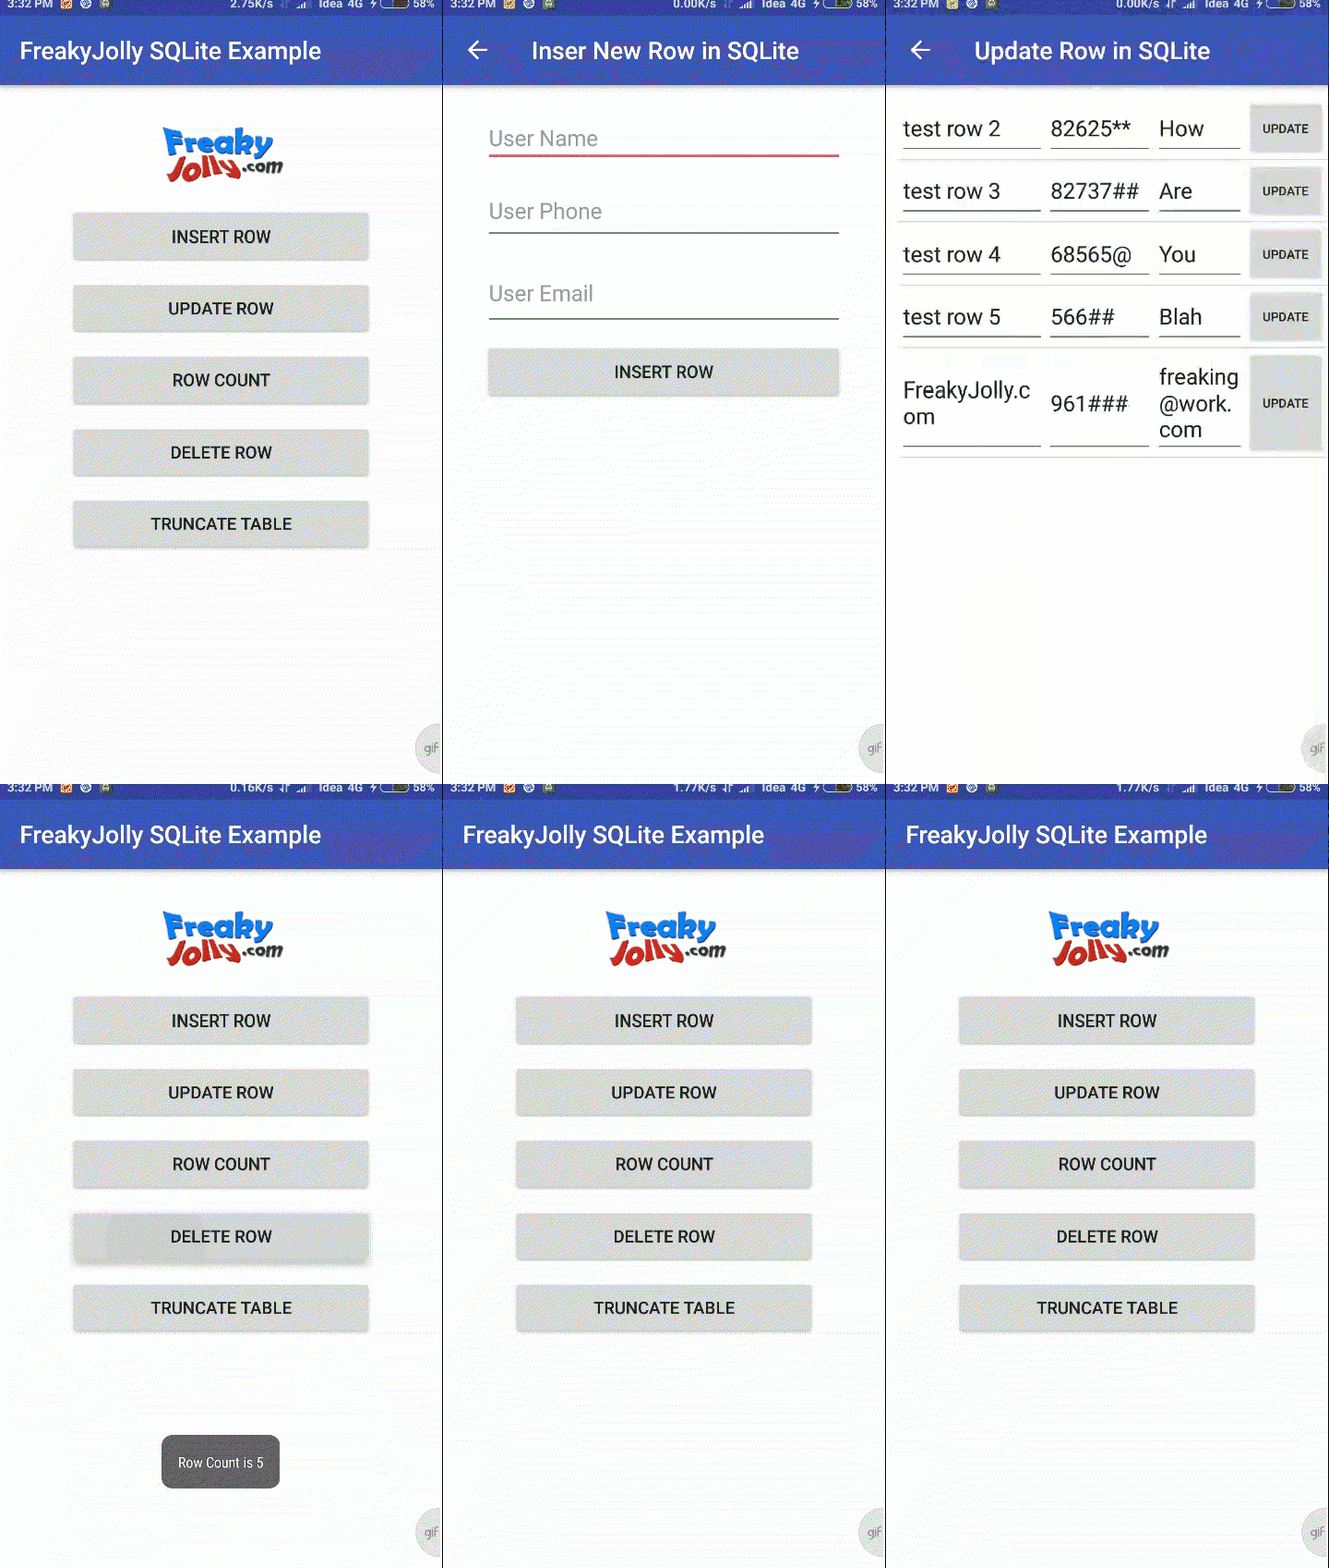
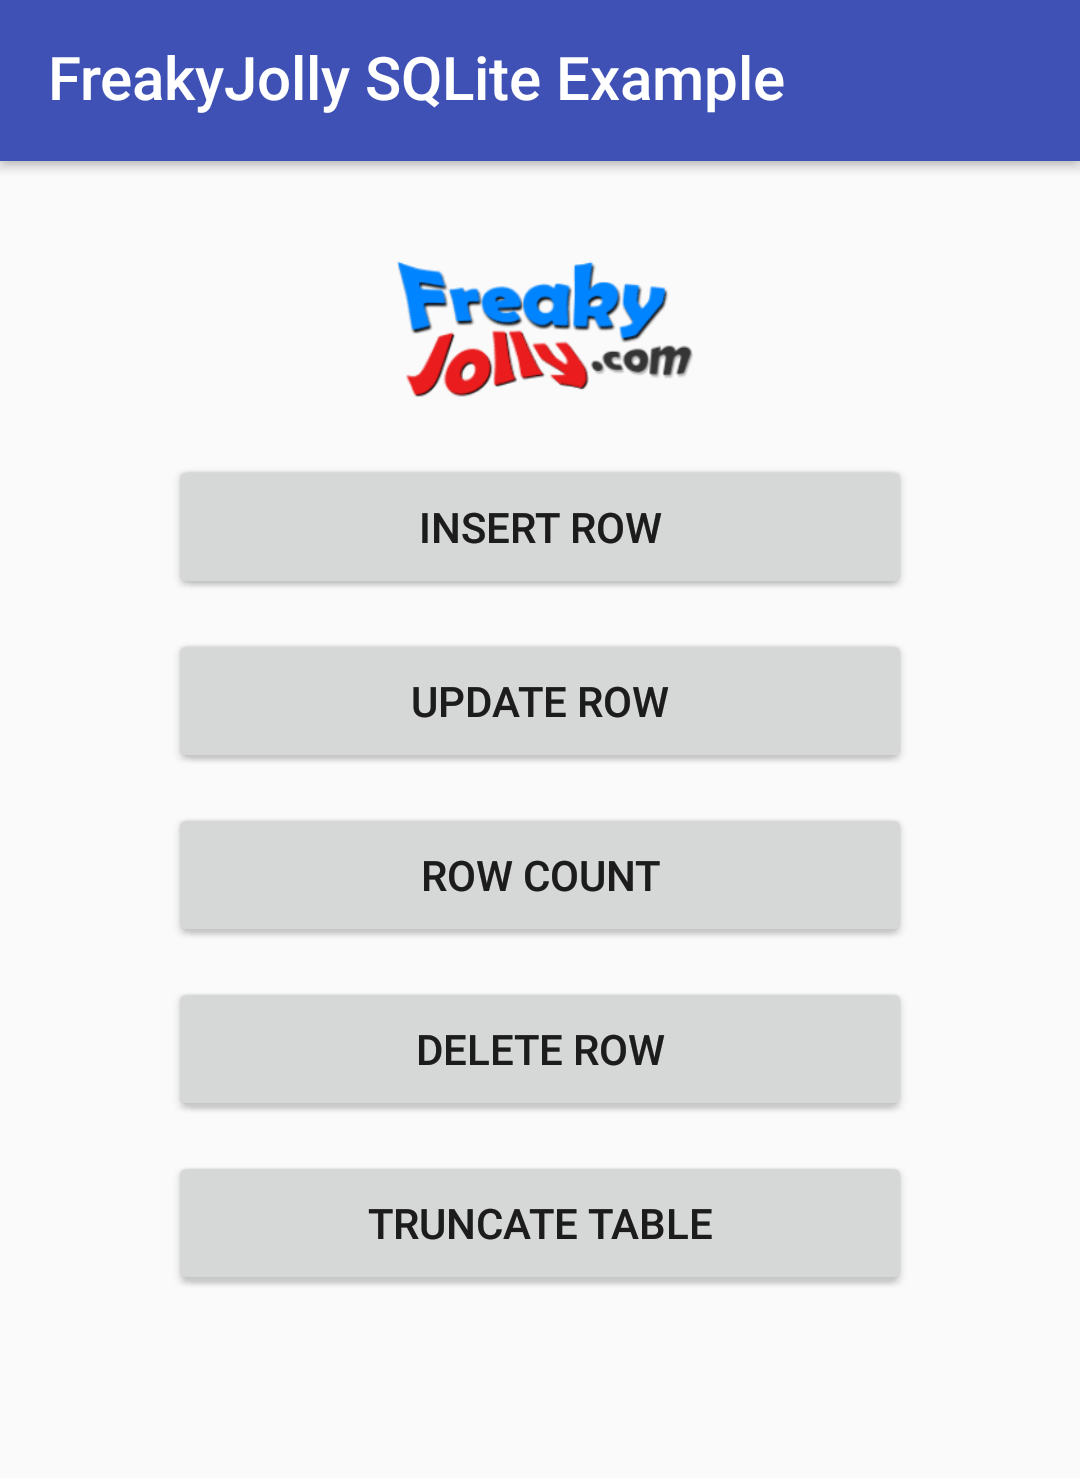
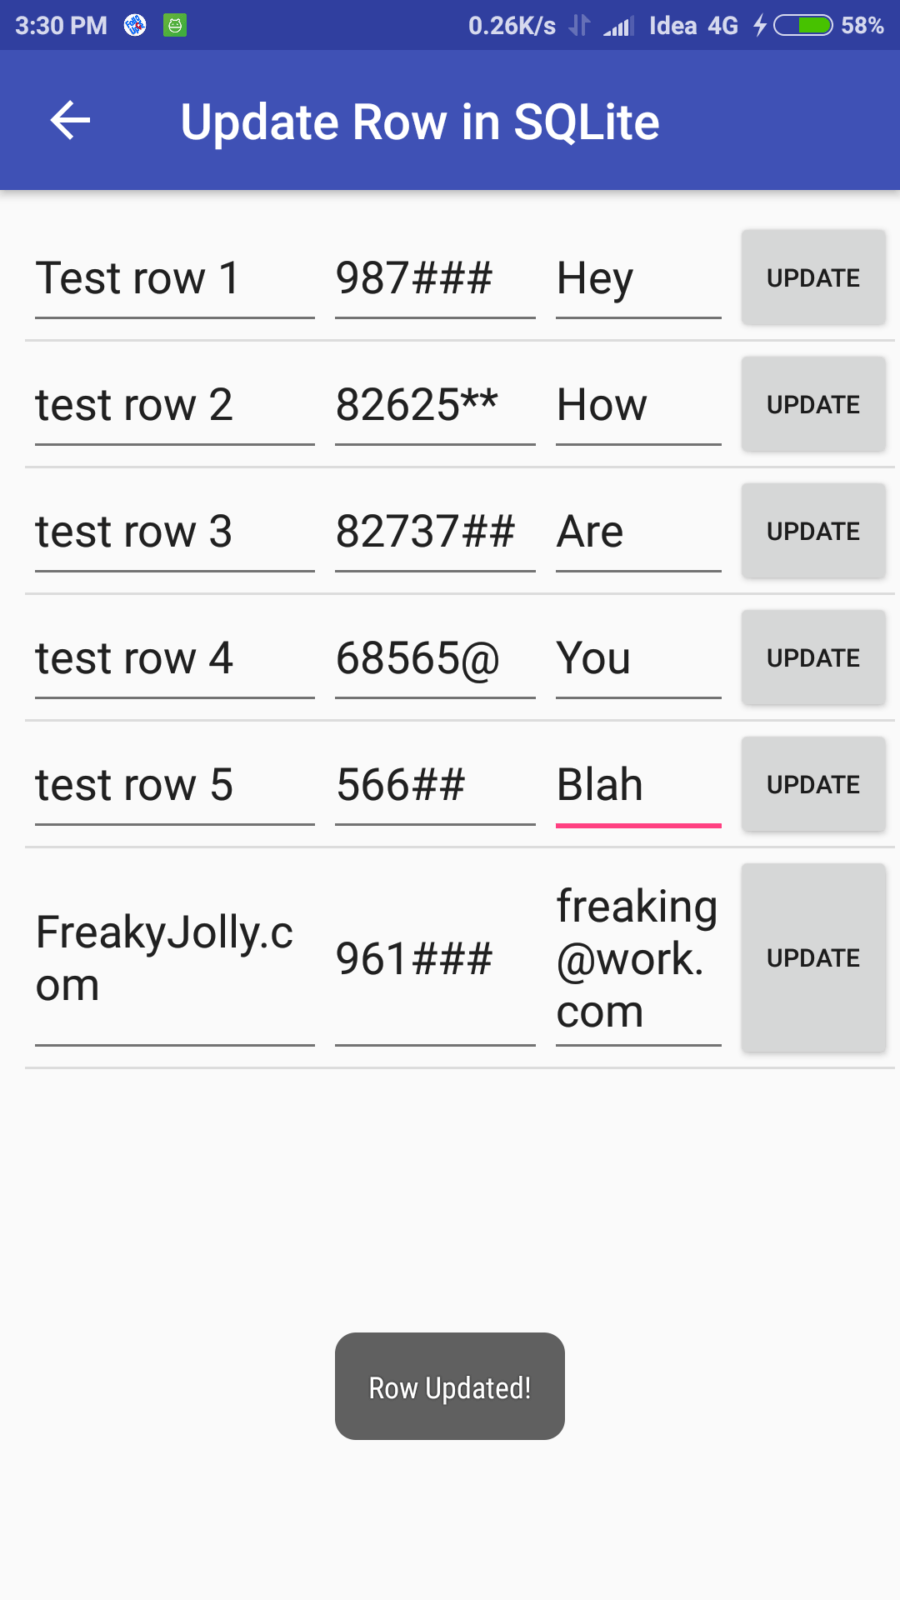
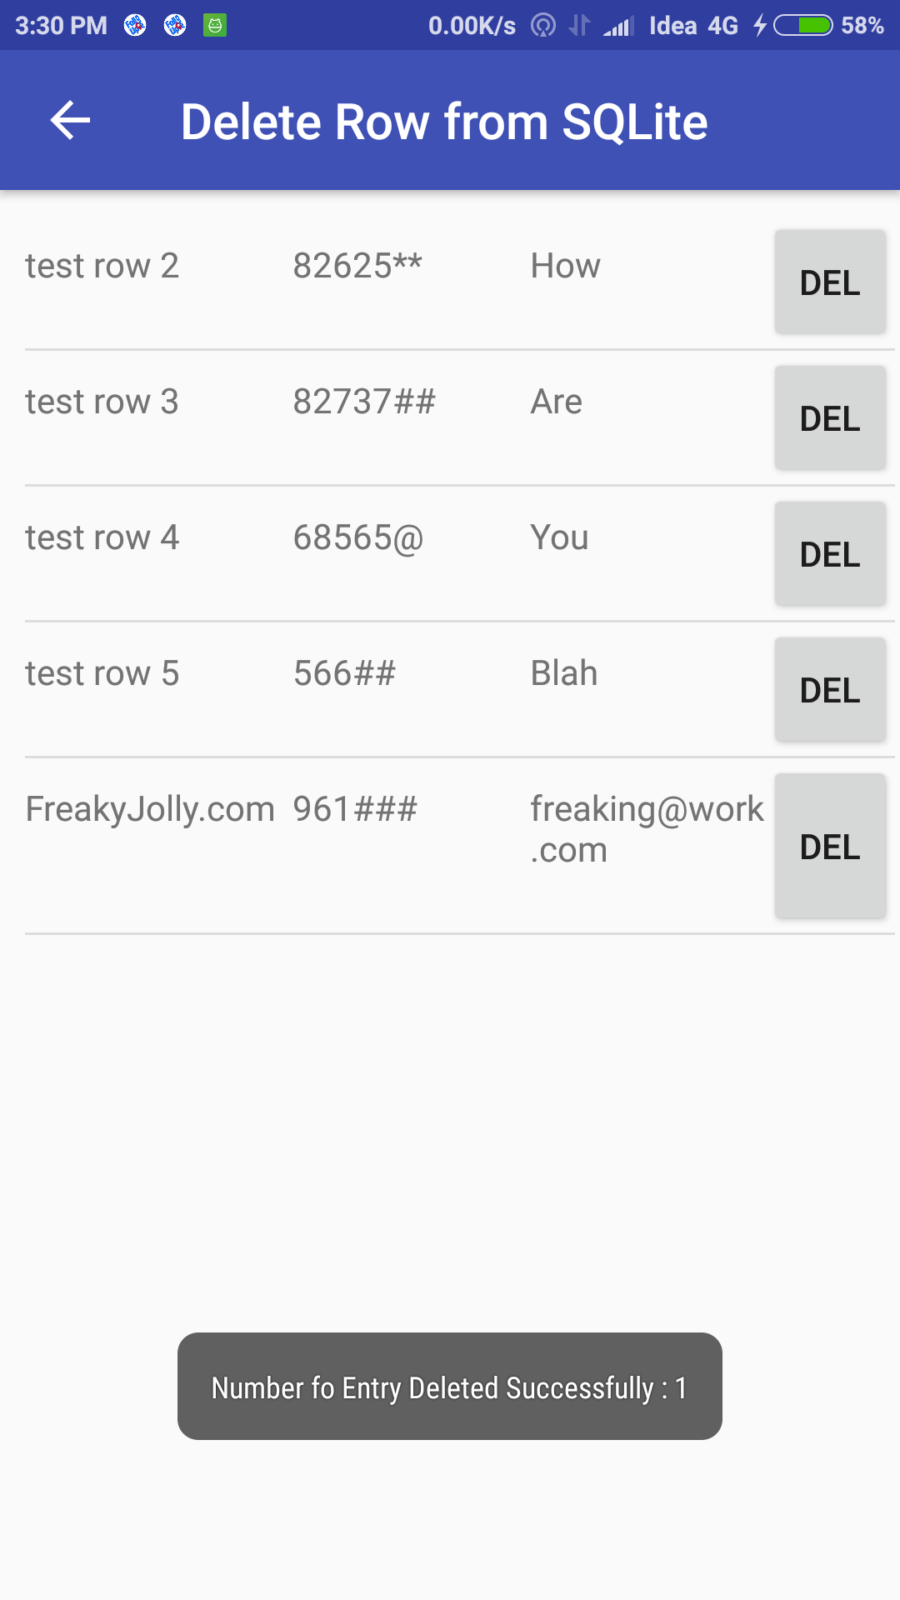
Before we start Let’s Have a look some application view which we are going to develop.
Step 1) Open Android Studio and create a new project with Empty Activity Selection.
Step 2) Next we will create “DataBaseHelper” which will extend “SQLiteOpenHelper” which is a helper class to manage database creation and version management.
package demo.freakysqllite.com.androidsqlite;

import android.content.Context;
import android.database.sqlite.SQLiteDatabase;
import android.database.sqlite.SQLiteOpenHelper;
import android.util.Log;

import static demo.freakysqllite.com.androidsqlite.UsersDatabaseAdapter.TABLE_NAME;

public class DataBaseHelper extends SQLiteOpenHelper {
    public DataBaseHelper(Context context, String name, SQLiteDatabase.CursorFactory factory, int version) {
        super(context, name, factory, version);
    }

    @Override
    public void onCreate(SQLiteDatabase _db) {
        try {
            _db.execSQL(UsersDatabaseAdapter.DATABASE_CREATE);
        }catch(Exception er){
            Log.e("Error","exceptioin");
        }
    }

    @Override
    public void onUpgrade(SQLiteDatabase _db, int _oldVersion, int _newVersion)
    {
        _db.execSQL("DROP TABLE IF EXISTS " + TABLE_NAME);
        _db.execSQL("DROP TABLE IF EXISTS " + "SEMESTER1");
        // Create a new one.
        onCreate(_db);
    }
}
Step 3) Create “UsersDatabaseAdapter” this class will have UPSERT Operation methods that we will execute in the database.
public class UsersDatabaseAdapter {
    static ArrayList<UserModel> users=new ArrayList<>();
    static final String DATABASE_NAME = "UsersDatabase.db";
    static final String TABLE_NAME = "USERS";
    static final int DATABASE_VERSION = 1;
    // SQL Statement to create a new database.
    static final String DATABASE_CREATE = "create table "+TABLE_NAME+"( ID integer primary key autoincrement,user_name  text,user_phone  text,user_email text); ";
    private static final String TAG = "UsersDatabaseAdapter:";

    // Variable to hold the database instance
    public static SQLiteDatabase db;
    // Context of the application using the database.
    private final Context context;
    // Database open/upgrade helper
    private static DataBaseHelper dbHelper;
    public  UsersDatabaseAdapter(Context _context)
    {
        context = _context;
        dbHelper = new DataBaseHelper(context, DATABASE_NAME, null, DATABASE_VERSION);
    }

    // Method to open the Database
    public  UsersDatabaseAdapter open() throws SQLException
    {
        db = dbHelper.getWritableDatabase();
        return this;
    }

    // Method to close the Database
    public void close()
    {
        db.close();
    }

    // method returns an Instance of the Database
    public  SQLiteDatabase getDatabaseInstance()
    {
        return db;
    }

    // method to insert a record in Table
    public static String insertEntry(String user_name, String user_phone, String user_email)
    {

        try {


            ContentValues newValues = new ContentValues();
            // Assign values for each column.
            newValues.put("user_name", user_name);
            newValues.put("user_phone", user_phone);
            newValues.put("user_email", user_email);

            // Insert the row into your table
            db = dbHelper.getWritableDatabase();
            long result=db.insert(TABLE_NAME, null, newValues);
            Log.i("Row Insert Result ", String.valueOf(result));
            toast("User Info Saved! Total Row Count is "+getRowCount());
            db.close();

        }catch(Exception ex) {
        }
        return "ok";
    }

    // method to get all Rows Saved in Table
    public static ArrayList<UserModel> getRows() throws JSONException {

        users.clear();
        UserModel user;
        db=dbHelper.getReadableDatabase();
        Cursor projCursor = db.query(TABLE_NAME, null, null,null, null, null, null,null);
        while (projCursor.moveToNext()) {

            user=new UserModel();
            user.setID(projCursor.getString(projCursor.getColumnIndex("ID")));
            user.setUsername(projCursor.getString(projCursor.getColumnIndex("user_name")));
            user.setUserphone(projCursor.getString(projCursor.getColumnIndex("user_phone")));
            user.setUseremail(projCursor.getString(projCursor.getColumnIndex("user_email")));
            users.add(user);
        }
        projCursor.close();
        return users;
    }

    // method to delete a Record in Tbale using Primary Key Here it is ID
    public static int deleteEntry(String ID)
    {
        String where="ID=?";
        int numberOFEntriesDeleted= db.delete(TABLE_NAME, where, new String[]{ID}) ;
        toast("Number fo Entry Deleted Successfully : "+numberOFEntriesDeleted);
        return numberOFEntriesDeleted;
    }

    // method to get Count of Toatal Rows in Table
    public static int getRowCount()
    {
        db=dbHelper.getReadableDatabase();
        Cursor cursor=db.query(TABLE_NAME, null, null, null, null, null, null);
        toast("Row Count is "+cursor.getCount());
        db.close();
        return cursor.getCount();
    }

    // method to Truncate/ Remove All Rows in Table
    public static void truncateTable()
    {
        db=dbHelper.getReadableDatabase();
        db.delete(TABLE_NAME, "1", null);
        db.close();
        toast("Table Data Truncated!");
    }

    // method to Update an Existing Row in Table
    public static void  updateEntry(String ID,String Username, String Userphone, String Useremail)
    {
        ContentValues updatedValues = new ContentValues();
        updatedValues.put("user_name", Username);
        updatedValues.put("user_phone", Userphone);
        updatedValues.put("user_email", Useremail);
        String where="ID = ?";
        db=dbHelper.getReadableDatabase();
        db.update(TABLE_NAME,updatedValues, where, new String[]{ID});
        db.close();
        toast("Row Updated!");
    }

}
Step 4) In “MainActivity” get an instance of “UsersDatabaseAdapter” to create DATABASE and TABLE.
Before OnCreate add
UsersDatabaseAdapter usersDatabaseAdapter;
In OnCreate method add
usersDatabaseAdapter=new UsersDatabaseAdapter(getApplicationContext());We will add some buttons to open respective Activities. We will add those button Methods as well, so MainActivity will look like this
public class MainActivity extends AppCompatActivity {

    UsersDatabaseAdapter usersDatabaseAdapter;

    @Override
    protected void onCreate(Bundle savedInstanceState) {
        super.onCreate(savedInstanceState);
        setContentView(R.layout.activity_main);
        // create the instance of Databse
        usersDatabaseAdapter=new UsersDatabaseAdapter(getApplicationContext());
    }

    //open activity to Insert new rows in table
    public void insertRowActivity(View view) {
        Intent myIntent = new Intent(MainActivity.this, InsertRowActivity.class);
        MainActivity.this.startActivity(myIntent);
    }

    //Open activity to update rows
    public void updateRowView(View view) {
        Intent myIntent = new Intent(MainActivity.this, updateRowsActivity.class);
        MainActivity.this.startActivity(myIntent);
    }

    //call method to show rows count in Toast
    public void rowCount(View view) {
        UsersDatabaseAdapter.getRowCount();
    }

    //Open activity to delete rows
    public void deleteRowActivity(View view) {
        Intent myIntent = new Intent(MainActivity.this, deleteRowsActivity.class);
        MainActivity.this.startActivity(myIntent);
    }

    //Button method to truncate table rows
    public void truncateTable(View view) {
        UsersDatabaseAdapter.truncateTable();
    }

    //Open URL in browser
    public void goToUrl (View view) {
        String url = "http://www.google.com";
        Uri uriUrl = Uri.parse(url);
        Intent launchBrowser = new Intent(Intent.ACTION_VIEW, uriUrl);
        startActivity(launchBrowser);
    }
}
activity_main.xml will look like this after adding all buttons
<?xml version="1.0" encoding="utf-8"?>
<android.support.constraint.ConstraintLayout xmlns:android="http://schemas.android.com/apk/res/android"
    xmlns:app="http://schemas.android.com/apk/res-auto"
    xmlns:tools="http://schemas.android.com/tools"
    android:layout_width="wrap_content"
    android:layout_height="wrap_content"
    android:layout_gravity="center_horizontal"
    android:layout_marginTop="20dp"
    tools:context=".MainActivity">

    <TableLayout
        android:layout_width="wrap_content"
        android:layout_height="wrap_content"
        android:gravity="center_vertical|center_horizontal">


        <TableRow
            android:layout_width="match_parent"
            android:layout_height="match_parent">

            <ImageView
                android:id="@+id/imageView"
                android:layout_width="match_parent"
                android:layout_height="60dp"
                android:layout_marginBottom="10dp"
                android:layout_marginTop="8dp"
                app:layout_constraintTop_toTopOf="parent"
                app:srcCompat="@drawable/freakyjollylogo"
                tools:layout_editor_absoluteX="8dp"
                android:onClick="goToUrl"/>
        </TableRow>


        <TableRow
            android:layout_width="match_parent"
            android:layout_height="match_parent">

            <Button
                android:id="@+id/insertRow"
                android:layout_width="wrap_content"
                android:layout_height="wrap_content"
                android:layout_marginBottom="10dp"
                android:onClick="insertRowActivity"
                android:text="Insert Row" />
        </TableRow>


        <TableRow
            android:layout_width="match_parent"
            android:layout_height="match_parent">
            <Button
                android:id="@+id/updateRowView"
                android:layout_width="wrap_content"
                android:layout_height="wrap_content"
                android:layout_marginBottom="10dp"
                android:onClick="updateRowView"
                android:text="Update Row" />

        </TableRow>

        <TableRow
            android:layout_width="match_parent"
            android:layout_height="match_parent">
            <Button
                android:id="@+id/rowCount"
                android:layout_width="wrap_content"
                android:layout_height="wrap_content"
                android:layout_marginBottom="10dp"
                android:onClick="rowCount"
                android:text="Row Count" />

        </TableRow>

        <TableRow
            android:layout_width="match_parent"
            android:layout_height="match_parent">

            <Button
                android:id="@+id/deleteRow"
                android:layout_width="wrap_content"
                android:layout_height="wrap_content"
                android:layout_marginBottom="10dp"
                android:onClick="deleteRowActivity"
                android:text="Delete Row" />
        </TableRow>


        <TableRow
            android:layout_width="match_parent"
            android:layout_height="match_parent">

            <Button
                android:id="@+id/truncateTable"
                android:layout_width="wrap_content"
                android:layout_height="wrap_content"
                android:layout_marginBottom="10dp"
                android:onClick="truncateTable"
                android:text="Truncate Table" />
        </TableRow>

        <TableRow
            android:layout_width="match_parent"
            android:layout_height="match_parent">


        </TableRow>


    </TableLayout>

</android.support.constraint.ConstraintLayout>
Step 5) Now we will add Three Activities and Two ListViews
Activities will be:
- activity_insert_row.xml
- activity_update_rows.xml
- activity_delete_rows.xml
How to add a new activity: Right Click on main package > New > Activity > Empty Activity
Here I will add one by one first will show layout code then Activity Code.
activity_insert_row.xml
<?xml version="1.0" encoding="utf-8"?>
<android.support.constraint.ConstraintLayout xmlns:android="http://schemas.android.com/apk/res/android"
    xmlns:app="http://schemas.android.com/apk/res-auto"
    xmlns:tools="http://schemas.android.com/tools"
    android:layout_width="wrap_content"
    android:layout_height="wrap_content"
    android:layout_gravity="center_horizontal"
    android:layout_marginTop="20dp"
    tools:context=".InsertRowActivity">


    <TableLayout
        android:layout_width="wrap_content"
        android:layout_height="wrap_content">

        <TableRow
            android:layout_width="match_parent"
            android:layout_height="match_parent">

            <EditText
                android:id="@+id/userNameTxt"
                android:layout_width="293dp"
                android:layout_height="wrap_content"
                android:layout_marginBottom="10dp"
                android:hint="User Name"
                android:inputType="textPersonName" />
        </TableRow>

        <TableRow
            android:layout_width="match_parent"
            android:layout_height="match_parent">

            <EditText
                android:id="@+id/userPhoneTxt"
                android:layout_width="289dp"
                android:layout_height="53dp"
                android:layout_marginBottom="10dp"
                android:hint="User Phone"
                android:inputType="phone" />
        </TableRow>

        <TableRow
            android:layout_width="match_parent"
            android:layout_height="match_parent">

            <EditText
                android:id="@+id/userEmailTxt"
                android:layout_width="291dp"
                android:layout_height="59dp"
                android:layout_marginBottom="10dp"
                android:hint="User Email"
                android:inputType="textEmailAddress" />
        </TableRow>

        <TableRow
            android:layout_width="match_parent"
            android:layout_height="match_parent">

            <Button
                android:id="@+id/insertRowFrom"
                android:layout_width="wrap_content"
                android:layout_height="wrap_content"
                android:onClick="insertRow"
                android:text="Insert Row" />
        </TableRow>
    </TableLayout>


</android.support.constraint.ConstraintLayout>
InsertRowActivity.java
public class InsertRowActivity extends AppCompatActivity {

    private TextView mUserName;
    private TextView mUserPhone;
    private TextView mUserEmail;
    private Button insertRowFrom;

    @Override
    protected void onCreate(Bundle savedInstanceState) {
        super.onCreate(savedInstanceState);
        setContentView(R.layout.activity_insert_row);
        //Toolbar toolbar = (Toolbar) findViewById(R.id.toolbar);
        //setSupportActionBar(toolbar);


        insertRowFrom = (Button) findViewById(R.id.insertRowFrom);
        mUserName = (TextView) findViewById(R.id.userNameTxt);
        mUserPhone = (TextView) findViewById(R.id.userPhoneTxt);
        mUserEmail = (TextView) findViewById(R.id.userEmailTxt);


        ActionBar actionBar = getSupportActionBar();
        if (actionBar != null) {
            actionBar.setDisplayHomeAsUpEnabled(true);
            actionBar.setTitle("Inser New Row in SQLite");
        }
    }

    public void insertRow(View view) {

        TextView userNameTxtView = findViewById(R.id.userNameTxt);
        TextView userPhoneTxtView = findViewById(R.id.userPhoneTxt);
        TextView userEmailTxtView = findViewById(R.id.userEmailTxt);

        if(userNameTxtView.getText().toString().trim().equals("")
                || userPhoneTxtView.getText().toString().trim().equals("")
                || userEmailTxtView.getText().toString().trim().equals("")){
            toast("Please Fill All Fields ");
        }else{
            UsersDatabaseAdapter.insertEntry(userNameTxtView.getText().toString().trim(),userPhoneTxtView.getText().toString(),userEmailTxtView.getText().toString());
            Intent myIntent = new Intent(InsertRowActivity.this, MainActivity.class);
            InsertRowActivity.this.startActivity(myIntent);
        }

    }

    public boolean onOptionsItemSelected(MenuItem item){
        switch (item.getItemId()) {
            case android.R.id.home:
                finish();
                return true;
        }
        return super.onOptionsItemSelected(item);
    }

    public boolean onCreateOptionsMenu(Menu menu) {
        return true;
    }

}
In InsertRowActivity we will show a form with three EditText fields and a submit button to save values to table using UsersDatabaseAdapter‘s insertEntry method
activity_update_rows.xml
<?xml version="1.0" encoding="utf-8"?>
<android.support.constraint.ConstraintLayout xmlns:android="http://schemas.android.com/apk/res/android"
    xmlns:app="http://schemas.android.com/apk/res-auto"
    xmlns:tools="http://schemas.android.com/tools"
    android:layout_width="match_parent"
    android:layout_height="match_parent"
    tools:context=".updateRowsActivity">


    <ListView
        android:id="@+id/listupdateviewID"
        android:layout_width="368dp"
        android:layout_height="495dp"
        android:layout_margin="10dp"
        android:padding="10dp"
        tools:layout_editor_absoluteX="8dp"
        tools:layout_editor_absoluteY="8dp" />

</android.support.constraint.ConstraintLayout>
updateRowsActivity.java
public class updateRowsActivity extends AppCompatActivity {
    static ListView listView ;
    ArrayList<UserModel> users=new ArrayList<>();
    static CustomListAdapterUpdateRows updateAdapter;
    @Override
    protected void onCreate(Bundle savedInstanceState) {
        super.onCreate(savedInstanceState);
        setContentView(R.layout.activity_update_rows);
        try {
            users = UsersDatabaseAdapter.getRows();
        } catch (JSONException e) {
            e.printStackTrace();
        }
        updateAdapter = new CustomListAdapterUpdateRows(this, users);
        listView = (ListView) findViewById(R.id.listupdateviewID);
        listView.setAdapter(updateAdapter);

        ActionBar actionBar = getSupportActionBar();
        if (actionBar != null) {
            actionBar.setDisplayHomeAsUpEnabled(true);
            actionBar.setTitle("Update Row in SQLite");
        }
    }


    public boolean onOptionsItemSelected(MenuItem item){
        switch (item.getItemId()) {
            case android.R.id.home:
                finish();
                return true;
        }
        return super.onOptionsItemSelected(item);
    }

    public boolean onCreateOptionsMenu(Menu menu) {
        return true;
    }

}
updateRowsActivity will have ListView to show all rows and each row will have an Update button to save values in table row
activity_delete_rows.xml
<?xml version="1.0" encoding="utf-8"?>
<android.support.constraint.ConstraintLayout xmlns:android="http://schemas.android.com/apk/res/android"
    xmlns:app="http://schemas.android.com/apk/res-auto"
    xmlns:tools="http://schemas.android.com/tools"
    android:layout_width="match_parent"
    android:layout_height="match_parent"
    tools:context=".deleteRowsActivity">


    <ListView
        android:id="@+id/listviewdeleteID"
        android:layout_width="368dp"
        android:layout_height="495dp"
        android:layout_margin="10dp"
        android:padding="10dp"
        tools:layout_editor_absoluteX="8dp"
        tools:layout_editor_absoluteY="8dp" />

</android.support.constraint.ConstraintLayout>
deleteRowsActivity.java
public class deleteRowsActivity extends AppCompatActivity {
    ListView listView ;
    ArrayList<UserModel> users=new ArrayList<>();
    static CustomListAdapterDeleteRows deleteAdapter;
    @Override
    protected void onCreate(Bundle savedInstanceState) {
        super.onCreate(savedInstanceState);
        setContentView(R.layout.activity_delete_rows);
        try {
            users = UsersDatabaseAdapter.getRows();
        } catch (JSONException e) {
            e.printStackTrace();
        }
        deleteAdapter = new CustomListAdapterDeleteRows(this, users);
        listView = (ListView) findViewById(R.id.listviewdeleteID);
        listView.setAdapter(deleteAdapter);

        ActionBar actionBar = getSupportActionBar();
        if (actionBar != null) {
            actionBar.setDisplayHomeAsUpEnabled(true);
            actionBar.setTitle("Delete Row from SQLite");
        }
    }


    public boolean onOptionsItemSelected(MenuItem item){
        switch (item.getItemId()) {
            case android.R.id.home:
                finish();
                return true;
        }
        return super.onOptionsItemSelected(item);
    }

    public boolean onCreateOptionsMenu(Menu menu) {
        return true;
    }

}
Now we will add two ListView layouts
How to add ListLayouts: Right Click on layout folder in res > New > Layout resource file
listviewupdate_row.xml
<?xml version="1.0" encoding="utf-8"?>
<LinearLayout xmlns:android="http://schemas.android.com/apk/res/android"
    xmlns:tools="http://schemas.android.com/tools"
    android:layout_width="match_parent"
    android:layout_height="wrap_content"
    android:orientation="horizontal">

    <EditText
        android:id="@+id/editText1"
        android:layout_width="96dp"
        android:layout_height="match_parent"
        android:layout_weight="1"
        android:text="" />

    <EditText
        android:id="@+id/editText2"
        android:layout_width="64dp"
        android:layout_height="match_parent"
        android:layout_weight="1"
        android:text="" />

    <EditText
        android:id="@+id/editText3"
        android:layout_width="50dp"
        android:layout_height="match_parent"
        android:layout_weight="1"
        android:text="" />

    <Button
        android:id="@+id/updateBtn"
        android:layout_width="41dp"
        android:layout_height="match_parent"
        android:layout_weight="1"
        android:onClick="deleteListRow"
        android:text="Update"
        android:textSize="10sp" />

</LinearLayout>
this ListLayout is for update row activity.
listviewdelete_row.xml
<?xml version="1.0" encoding="utf-8"?>
<LinearLayout xmlns:android="http://schemas.android.com/apk/res/android"
    xmlns:tools="http://schemas.android.com/tools"
    android:layout_width="match_parent"
    android:layout_height="wrap_content"
    android:orientation="horizontal">

    <TextView
        android:id="@+id/textView1"
        android:layout_width="95dp"
        android:layout_height="match_parent"
        android:layout_marginBottom="10dp"
        android:layout_marginTop="10dp"
        android:layout_weight="1"
        android:text="TextView" />

    <TextView
        android:id="@+id/textView2"
        android:layout_width="83dp"
        android:layout_height="match_parent"
        android:layout_marginBottom="10dp"
        android:layout_marginTop="10dp"
        android:layout_weight="1"
        android:text="TextView" />

    <TextView
        android:id="@+id/textView3"
        android:layout_width="82dp"
        android:layout_height="match_parent"
        android:layout_marginBottom="10dp"
        android:layout_marginTop="10dp"
        android:layout_weight="1"
        android:text="TextView" />

    <Button
        android:id="@+id/button1"
        android:layout_width="40dp"
        android:layout_height="match_parent"
        android:layout_weight="1"
        android:text="Del"
        android:onClick="deleteListRow"/>

</LinearLayout>
this List layout is for update activity
Step 6) Now we will add CustomList Adapter files, these will list the user data in ListViews for Update and Delete.
CustomListAdapterUpdateRows.java
public class CustomListAdapterUpdateRows extends BaseAdapter {

    Context c;
    ArrayList<UserModel> users;

    public CustomListAdapterUpdateRows(Context c, ArrayList<UserModel> users) {
        this.c = c;
        this.users = users;
    }

    @Override
    public int getCount() {
        return users.size();
    }

    @Override
    public Object getItem(int i) {
        return users.get(i);
    }

    @Override
    public long getItemId(int i) {
        return i;
    }

    @Override
    public View getView(final int i, View view, ViewGroup viewGroup) {
        if(view==null)
        {
            view= LayoutInflater.from(c).inflate(R.layout.listviewupdate_row,viewGroup,false);
        }

        final EditText meditText1 = (EditText) view.findViewById(R.id.editText1);
        final EditText meditText2 = (EditText) view.findViewById(R.id.editText2);
        final EditText meditText3 = (EditText) view.findViewById(R.id.editText3);
        Button updateBtn = (Button) view.findViewById(R.id.updateBtn);

        final UserModel user= (UserModel) this.getItem(i);
        meditText1.setText(user.getUsername());
        meditText2.setText(user.getUserphone());
        meditText3.setText(user.getUseremail());

        updateBtn.setOnClickListener(new View.OnClickListener() {
            public void onClick(View v) {
                String col1value = meditText1.getText().toString();
                String col2value = meditText2.getText().toString();
                String col3value = meditText3.getText().toString();
                UsersDatabaseAdapter.updateEntry(user.getID(),col1value,col2value,col3value);
            }
        });

        return view;
    }
}
CustomListAdapterDeleteRows.java
public class CustomListAdapterDeleteRows extends BaseAdapter {

    Context c;
    ArrayList<UserModel> users;

    public CustomListAdapterDeleteRows(Context c, ArrayList<UserModel> users) {
        this.c = c;
        this.users = users;
    }

    @Override
    public int getCount() {
        return users.size();
    }

    @Override
    public Object getItem(int i) {
        return users.get(i);
    }

    @Override
    public long getItemId(int i) {
        return i;
    }

    @Override
    public View getView(final int i, View view, ViewGroup viewGroup) {
        if(view==null)
        {
            view=LayoutInflater.from(c).inflate(R.layout.listviewdelete_row,viewGroup,false);
        }

        TextView mtextView1 = (TextView) view.findViewById(R.id.textView1);
        TextView mtextView2 = (TextView) view.findViewById(R.id.textView2);
        TextView mtextView3 = (TextView) view.findViewById(R.id.textView3);
        Button deleteBtn = (Button) view.findViewById(R.id.button1);

        final UserModel user= (UserModel) this.getItem(i);
        mtextView1.setText(user.getUsername());
        mtextView2.setText(user.getUserphone());
        mtextView3.setText(user.getUseremail());

        deleteBtn.setOnClickListener(new View.OnClickListener() {
            public void onClick(View v) {
                UsersDatabaseAdapter.deleteEntry(user.getID());
                users.remove(i);
                notifyDataSetChanged();
            }
        });

        return view;
    }
}
Step 7) Create a User Model to get and set data values.
UserModel.java
public class UserModel {

    String ID,username,phone,email;

    public String getID() {
        return ID;
    }

    public void setID(String ID) {
        this.ID = ID;
    }
    public String getUsername() {
        return username;
    }

    public void setUsername(String username) {
        this.username = username;
    }
        public String getUserphone() {
            return phone;
        }

        public void setUserphone(String phone) {
            this.phone = phone;
        }
        public String getUseremail() {
            return email;
        }

        public void setUseremail(String email) {
            this.email = email;
        }

    }
Phewww… so we have added all the files we needed for this example app to work as expected. In most places, I have already added inline comments. let me know in comments if you have Questions…
Oops here is source code for above application 😛


